AI-102 Notes
Intro
Understanding Considerations for Responsible AI
- Fairness - AI systems should treat all people fairly
- Reliability and Safety - AI systems should perform reliably and safely
- Privacy and Security - Be secure and respect privacy
- Inclusiveness - Empower people and engage people
- Transparency - Should be understandable
- Accountability - People should be accountable for AI systems
Understanding Capabilities of Azure Machine Learning
Capabilities of Azure AI Services
- Natural Language Processing
- Text analysis
- Question Answering
- Language Understanding
- Translations
- Named Entity recognition
- Custom text classification
- Speech
- Speech translation
- Knowledge mining and document intelligence
- AI search
- document intelligence
- Custom document intelligence
- Custom skills
- Computer vision
- Image analysis
- Video analysis
- Image classification
- Object detection
- Facial analysis
- OCR
- AI video indexer
- Decision support
- Content safety
- Content moderation
- GenAI
- Azure OpenAI service
- DALL-E image generation
Azure OpenAI Service
Azure Cognitive Search
Basically a search engine where you can add AI skills to enhance the index with insights derived from the source data.
Create and consume Azure AI services
Provision an Azure AI services Resource
- Multi Service resource - One resource that supports multiple different AI services. (Used when you need to manage multiple resources through a single credential)
- Single service resource - Individual resource for separate services. Helps to manage billing separately for each of the services.
To consume services you need the following:
- Endpoint URI - Uniform Resource IDentifier
- Subcription Key
- Location
To use the service:
- HTTP endpoints
- SDK - .net, python, Node, Go and java
Secure AI Services
Protecting Keys
- Regenerating keys- periodically
- Using Azure Key vault
- Token based authentication
- Microsoft Entra ID
- Managed Entities
- Using Service Principals
Network Safety
Adding IP addresses to white label them
Deploy Azure AI Services in Containers
Useful for on premises
Container Deployment
- Docker server
- Azure container Instance
- Azure Kubernetes Service Cluster
To deploy and use Azure AI services container:
- Download the specific container for the Azure AI services API and deploy it to a container host.
- Client applications submit data to the endpoint and get results just like they would normally through azure endpoints
- Some usage metrics are periodically sent over to azure AI services to calculate billing for the service
Some Language Containers
| Feature | Image | | --- | --- | | Key Phrase Extraction | mcr.microsoft.com/azure-cognitive-services/textanalytics/keyphrase | | Language Detection | mcr.microsoft.com/azure-cognitive-services/textanalytics/language | | Sentiment Analysis | mcr.microsoft.com/azure-cognitive-services/textanalytics/sentiment | | Named Entity Recognition | mcr.microsoft.com/product/azure-cognitive-services/textanalytics/language/about | | Text Analytics for health | mcr.microsoft.com/product/azure-cognitive-services/textanalytics/healthcare/about | | Translator | mcr.microsoft.com/product/azure-cognitive-services/translator/text-translation/about | | Summarization | mcr.microsoft.com/azure-cognitive-services/textanalytics/summarization |
Some Speech Containers
| Feature | Image | | --- | --- | | Speech to text | mcr.microsoft.com/product/azure-cognitive-services/speechservices/speech-to-text/about | | Custom Speech to text | mcr.microsoft.com/product/azure-cognitive-services/speechservices/custom-speech-to-text/about | | Neural Text to speech | mcr.microsoft.com/product/azure-cognitive-services/speechservices/neural-text-to-speech/about | | Speech language detection | mcr.microsoft.com/product/azure-cognitive-services/speechservices/language-detection/about |
Vision Containers
| Feature | Image | | --- | --- | | Read OCR | mcr.microsoft.com/product/azure-cognitive-services/vision/read/about | | Spatial analysis | mcr.microsoft.com/product/azure-cognitive-services/vision/spatial-analysis/about |
When using AI services via containers, you must provide 3 parameters:
- ApiKey
- Billing(Endpoint URI)
- Eula(Value of accept to state you accept the license for the container)
To use the container via docker, you can use the command docker pull followed by the URL for the required resource.
Analyzing Images
AI Vision - Used to extract information from images
- Description and tag generation - determining an appropriate caption for an image, and identifying relevant "tags" that can be used as keywords to indicate its subject.
- Object detection - detecting the presence and location of specific objects within the image.
- People detection - detecting the presence, location, and features of people in the image.
- Image metadata, color, and type analysis - determining the format and size of an image, its dominant color palette, and whether it contains clip art.
- Category identification - identifying an appropriate categorization for the image, and if it contains any known landmarks.
- Background removal - detecting the background in an image and output the image with the background transparent or a greyscale alpha matte image.
- Moderation rating - determine if the image includes any adult or violent content.
- Optical character recognition - reading text in the image.
- Smart thumbnail generation - identifying the main region of interest in the image to create a smaller "thumbnail" version.
Analyzing an Image
from azure.ai.vision.imageanalysis import ImageAnalysisClient
from azure.ai.vision.imageanalysis.models import VisualFeatures
from azure.core.credentials import AzureKeyCredential

client = ImageAnalysisClient(
    endpoint=os.environ["ENDPOINT"],
    credential=AzureKeyCredential(os.environ["KEY"])
)

result = client.analyze(
    image_url="<url>",
    visual_features=[VisualFeatures.CAPTION, VisualFeatures.READ],
    gender_neutral_caption=True,
    language="en",
)
Available visual features are contained in the VisualFeatures enum:
- VisualFeatures.TAGS: Identifies tags about the image, including objects, scenery, setting, and actions
- VisualFeatures.OBJECTS: Returns the bounding box for each detected object
- VisualFeatures.CAPTION: Generates a caption of the image in natural language
- VisualFeatures.DENSE_CAPTIONS: Generates more detailed captions for the objects detected
- VisualFeatures.PEOPLE: Returns the bounding box for detected people
- VisualFeatures.SMART_CROPS: Returns the bounding box of the specified aspect ratio for the area of interest
- VisualFeatures.READ: Extracts readable text
Output
{
  "apim-request-id": "abcde-1234-5678-9012-f1g2h3i4j5k6",
  "modelVersion": "<version>",
  "denseCaptionsResult": {
    "values": [
      {
        "text": "a house in the woods",
        "confidence": 0.7055229544639587,
        "boundingBox": {
          "x": 0,
          "y": 0,
          "w": 640,
          "h": 640
        }
      },
      {
        "text": "a trailer with a door and windows",
        "confidence": 0.6675070524215698,
        "boundingBox": {
          "x": 214,
          "y": 434,
          "w": 154,
          "h": 108
        }
      }
    ]
  },
  "metadata": {
    "width": 640,
    "height": 640
  }
}
Generate a smart-cropped thumbnail and remove background
Uses alpha matte
Classify Images
Use Azure AI Custom Vision
Creating a solution involves 2 tasks:
- Use existing (labeled) images to train an Azure AI Custom Vision model.
- Create a client application that submits new images to your model to generate predictions.
To use the Azure AI Custom Vision service, you must provision two kinds of Azure resource:
-
A training resource (used to train your models). This can be:
- An Azure AI Services resource.
- An Azure AI Custom Vision (Training) resource.
-
A prediction resource, used by client applications to get predictions from your model. This can be:
- An Azure AI Services resource.
- An Azure AI Custom Vision (Prediction) resource.
Types of classification
- Multi class - there are multiple classes, but each image can belong to only one class)
- Multi label - image associated with multiple labels
Steps to create an image classification model
- Create an image classification project for your model and associate it with a training resource.
- Upload images, assigning class label tags to them.
- Review and edit tagged images.
- Train and evaluate a classification model.
- Test a trained model.
- Publish a trained model to a prediction resource.
Detect, analyze, and recognize faces
Identify options for face detection analysis and identification
Two Azure AI Services to build solutions that detect faces or people in images:
- Image Analysis - The Azure AI Vision service enables you to detect people in an image, as well as returning a bounding box for its location.
- Face service
- Face detection (with bounding box).
- Comprehensive facial feature analysis (including head pose, presence of spectacles, blur, facial landmarks, occlusion and others).
- Face comparison and verification.
- Facial recognition.

Understand considerations for face analysis
When building a solution that uses facial data, considerations include (but aren't limited to):
- Data privacy and security. Facial data is personally identifiable, and should be considered sensitive and private. You should ensure that you have implemented adequate protection for facial data used for model training and inferencing.
- Transparency. Ensure that users are informed about how their facial data is used, and who will have access to it.
- Fairness and inclusiveness. Ensure that your face-based system can't be used in a manner that is prejudicial to individuals based on their appearance, or to unfairly target individuals.
Detect faces with the Azure AI Vision service
To detect and analyze faces with the Azure AI Vision service, call the Analyze Image function (SDK or equivalent REST method), specifying People as one of the visual features to be returned.
{
  "modelVersion": "2023-10-01",
  "metadata": {
    "width": 400,
    "height": 600
  },
  "peopleResult": {
    "values": [
      {
        "boundingBox": {
          "x": 0,
          "y": 56,
          "w": 101,
          "h": 189
        },
        "confidence": 0.9474349617958069
      },
      {
        "boundingBox": {
          "x": 402,
          "y": 96,
          "w": 124,
          "h": 156
        },
        "confidence": 0.9310565276194865
      },
    ...
    ]
  }
}
Understand capabilities of the face service

The Face service provides functionality that you can use for:
- Face detection - for each detected face, the results include an ID that identifies the face and the bounding box coordinates indicating its location in the image.
- Face attribute analysis - you can return a wide range of facial attributes, including:
- Head pose (pitch, roll, and yaw orientation in 3D space)
- Glasses (NoGlasses, ReadingGlasses, Sunglasses, or Swimming Goggles)
- Blur (low, medium, or high)
- Exposure (underExposure, goodExposure, or overExposure)
- Noise (visual noise in the image)
- Occlusion (objects obscuring the face)
- Accessories (glasses, headwear, mask)
- QualityForRecognition (low, medium, or high)
- Facial landmark location - coordinates for key landmarks in relation to facial features (for example, eye corners, pupils, tip of nose, and so on)
- Face comparison - you can compare faces across multiple images for similarity (to find individuals with similar facial features) and verification (to determine that a face in one image is the same person as a face in another image)
- Facial recognition - you can train a model with a collection of faces belonging to specific individuals, and use the model to identify those people in new images.
- Facial liveness - liveness can be used to determine if the input video is a real stream or a fake to prevent bad intentioned individuals from spoofing the recognition system.
You can provision Face as a single-service resource, or you can use the Face API in a multi-service Azure AI Services resource.
If you want to use the identification, recognition, and verification features of Face, you'll need to apply for the Limited Access policy and get approval before these features are available.
Compare and match detected faces
When a face is detected by the Face service, a unique ID is assigned to it and retained in the service resource for 24 hours. The ID is a GUID, with no indication of the individual's identity other than their facial features.

Implement facial recognition
To train a facial recognition model with the Face service:
-
Create a Person Group that defines the set of individuals you want to identify (for example, employees).
-
Add a Person to the Person Group for each individual you want to identify.
-
Add detected faces from multiple images to each person, preferably in various poses. The IDs of these faces will no longer expire after 24 hours (so they're now referred to as persisted faces).
-
Train the model.

Read Text in images and documents with the Azure AI Vision Service
Learnings :
- Identify how the Azure AI Vision service enables you to read text from images
- Use the Azure AI Vision service with SDKs and the REST API
- Develop an application that can read printed and handwritten text
Explore Azure AI Vision options for reading text
Azure AI provides two different features that read text from documents and images, one in the Azure AI Vision Service, the other in Azure AI Document Intelligence. There is overlap in what each service provides, however each is optimized for results depending on what the input is.
- Image Analysis Optical character recognition (OCR):
- Use this feature for general, unstructured documents with smaller amount of text, or images that contain text.
- Results are returned immediately (synchronous) from a single API call.
- Has functionality for analyzing images past extracting text, including object detection, describing or categorizing an image, generating smart-cropped thumbnails and more.
- Examples include: street signs, handwritten notes, and store signs.
- Document Intelligence:
- Use this service to read small to large volumes of text from images and PDF documents.
- This service uses context and structure of the document to improve accuracy.
- The initial function call returns an asynchronous operation ID, which must be used in a subsequent call to retrieve the results.
- Examples include: receipts, articles, and invoices.
Use Prebuilt Form Recognizer Model
Several of the prebuilt models are trained on specific form types:
- Invoice model. Extracts common fields and their values from invoices.
- Receipt model. Extracts common fields and their values from receipts.
- W2 model. Extracts common fields and their values from the US Government's W2 tax declaration form.
- ID document model. Extracts common fields and their values from US drivers' licenses and international passports.
- Business card model. Extracts common fields and their values from business cards.
- Health insurance card model. Extracts common fields and their values from health insurance cards.
The other models are designed to extract values from documents with less specific structures:
- Read model. Extracts text and languages from documents.
- General document model. Extract text, keys, values, entities and selection marks from documents.
- Layout model. Extracts text and structure information from documents.
Features of prebuilt models
The prebuilt models are designed to extract different types of data from the documents and forms users submit. To select the right model for your requirements, you must understand these features:
- Text extraction. All the prebuilt models extract lines of text and words from hand-written and printed text.
- Key-value pairs. Spans of text within a document that identify a label or key and its response or value are extracted by many models as key-values pairs. For example, a typical key might be Weight and its value might be 31 kg.
- Entities. Text that includes common, more complex data structures can be extracted as entities. Entity types include people, locations, and dates.
- Selection marks. Spans of text that indicate a choice can be extracted by some models as selection marks. These marks include radio buttons and check boxes.
- Tables. Many models can extract tables in scanned forms included the data contained in cells, the numbers of columns and rows, and column and row headings. Tables with merged cells are supported.
- Fields. Models trained for a specific form type identify the values of a fixed set of fields. For example, the Invoice model includes CustomerName and InvoiceTotal fields.
Input Requirements
- The file must be in JPEG, PNG, BMP, TIFF, or PDF format. Additionally, the Read model can accept Microsoft Office files.
- The file must be smaller than 500 MB for the standard tier, and 4 MB for the free tier.
- Images must have dimensions between 50 x 50 pixels and 10,000 x 10,000 pixels.
- PDF documents must have dimensions less than 17 x 17 inches or A3 paper size.
- PDF documents must not be protected with a password.
To make the connection via the SDK/API you need:
- The service endpoint. This value is the URL where the service is published.
- The API key. This value is a unique key that grants access.
poller = document_analysis_client.begin_analyze_document_from_url(
    "prebuilt-document", docUrl)
result: AnalyzeResult = poller.result()
Use the General Document, Read, and Layout models
Using the read model
Read model can detect the language and classify if it is hand written or printed text.
For multi-page PDF or TIFF files, you can use the pages parameter in your request to fix a page range for the analysis.
The read model is ideal if you want to extract words and lines from documents with no fixed or predictable structure.
General Document Model
The model can extract these values from structured, semi-structured, and unstructured documents.
The general document model is the only prebuilt model to support entity extraction.
It can recognize entities such as people, organizations, and dates and it runs against the whole document, not just key-value pairs. This approach ensures that, when structural complexity has prevented the model extracting a key-value pair, an entity can be extracted instead. Remember, however, that sometimes a single piece of text might return both a key-value pair and an entity.
The types of entities you can detect include:
Person. The name of a person.PersonType. A job title or role.Location. Buildings, geographical features, geopolitical entities.Organization. Companies, government bodies, sports clubs, musical bands, and other groups.Event. Social gatherings, historical events, anniversaries.Product. Objects bought and sold.Skill. A capability belonging to a person.Address. Mailing address for a physical location.Phone number. Dialing codes and numbers for mobile phones and landlines.Email. Email addresses.URL. Webpage addresses.IP Address. Network addresses for computer hardware.DateTime. Calendar dates and times of day.Quantity. Numerical measurements with their units.
Using the layout model
The layout model returns selection marks and tables from the input image or PDF file. It's a good model to use when you need rich information about the structure of a document.
For example, each table cell is extracted with:
- Its content text.
- The size and position of its bounding box.
- If it's part of a header column.
- Indexes to indicate its row and column position in the table.
Selection marks are extracted with their bounding box, a confidence indicator, and whether they're selected or not.
Use financial, ID, and tax models
Analyze video
Understand Azure Video Indexer capabilities
Used to extract information from videos.
It provides functionality that you can use for:
- Facial recognition - detecting the presence of individual people in the image. This requires Limited Access approval.
- Optical character recognition - reading text in the video.
- Speech transcription - creating a text transcript of spoken dialog in the video.
- Topics - identification of key topics discussed in the video.
- Sentiment - analysis of how positive or negative segments within the video are.
- Labels - label tags that identify key objects or themes throughout the video.
- Content moderation - detection of adult or violent themes in the video.
- Scene segmentation - a breakdown of the video into its constituent scenes.
The Video Analyzer service provides a portal website that you can use to upload, view, and analyze videos interactively.
Extract custom insights
Azure Video Indexer includes predefined models that can recognize well-known celebrities, do OCR, and transcribe spoken phrases into text.
Custom models can also be built for :
- People - add images of faces of people you want to recognize in your video.
- Language - If your organization uses specific terminology that may not be in common usage, you can train a custom model to detect and transcribe it.
- Brands - You can train a model to recognize specific names as brands, for example to identify products, projects, or companies that are relevant to your business.
Use Video Analyzer widgets and APIs
There are 2 ways to integrate with custom applications:
-
Azure Video Indexer Widgets
The widgets used in the Azure Video Indexer portal to play, analyze, and edit videos can be embedded in your own custom HTML interfaces. You can use this technique to share insights from specific videos with others without giving them full access to your account in the Azure Video Indexer portal.
-
Azure Video Indexer API
https://api.videoindexer.ai/Auth/<location>/Accounts/<accountId>/AccessTokensample response:
{
    "accountId": "SampleAccountId",
    "id": "30e66ec1b1",
    "partition": null,
    "externalId": null,
    "metadata": null,
    "name": "test3",
    "description": null,
    "created": "2018-04-25T16=50=00.967+00=00",
    "lastModified": "2018-04-25T16=58=13.409+00=00",
    "lastIndexed": "2018-04-25T16=50=12.991+00=00",
    "privacyMode": "Private",
    "userName": "SampleUserName",
    "isOwned": true,
    "isBase": true,
    "state": "Processing",
    "processingProgress": "",
    "durationInSeconds": 13,
    "thumbnailVideoId": "30e66ec1b1",
    "thumbnailId": "55848b7b-8be7-4285-893e-cdc366e09133",
    "social": {
        "likedByUser": false,
        "likes": 0,
        "views": 0
    },
    "searchMatches": [],
    "indexingPreset": "Default",
    "streamingPreset": "Default",
    "sourceLanguage": "en-US"
}
These can also be deployed via Deploy with ARM templates.
First generate the token and then use the token to get response from an API.
For a full list of available APIs, see the Video Indexer Developer Portal.
First step is to index a video.
Analyze text with Azure AI Language
Provision an Azure AI language
Azure AI Language is designed to help you extract information from text. It provides functionality that you can use for:
- Language detection - determining the language in which text is written.
- Key phrase extraction - identifying important words and phrases in the text that indicate the main points.
- Sentiment analysis - quantifying how positive or negative the text is.
- Named entity recognition - detecting references to entities, including people, locations, time periods, organizations, and more.
- Entity linking - identifying specific entities by providing reference links to Wikipedia articles.
Detect Language
Language detection can work with documents or single phrases. It's important to note that the document size must be under 5,120 characters. The size limit is per document and each collection is restricted to 1,000 items (IDs). A sample of a properly formatted JSON payload that you might submit to the service in the request body is shown here, including a collection of documents, each containing a unique id and the text to be analyzed. Optionally, you can provide a countryHint to improve prediction performance.
Extract Key Phrases
key phrase extraction is the process of evaluating the text of a document, or documents, and then identifying the main points around the context of the document(s).
Key phrase extraction works best for larger documents (the maximum size that can be analyzed is 5,120 characters).
Sample input:
{
    "kind": "KeyPhraseExtraction",
    "parameters": {
        "modelVersion": "latest"
    },
    "analysisInput":{
        "documents":[
            {
              "id": "1",
              "language": "en",
              "text": "You must be the change you wish
                       to see in the world."
            },
            {
              "id": "2",
              "language": "en",
              "text": "The journey of a thousand miles
                       begins with a single step."
            }
        ]
    }
}
Sample Output
{
    "kind": "KeyPhraseExtractionResults",
    "results": {
    "documents": [
        {
         "id": "1",
         "keyPhrases": [
           "change",
           "world"
         ],
         "warnings": []
       },
       {
         "id": "2",
         "keyPhrases": [
           "miles",
           "single step",
           "journey"
         ],
         "warnings": []
       }
],
    "errors": [],
    "modelVersion": "2021-06-01"
    }
}
Sentiment Analysis
Sample input:
{
  "kind": "SentimentAnalysis",
  "parameters": {
    "modelVersion": "latest"
  },
  "analysisInput": {
    "documents": [
      {
        "id": "1",
        "language": "en",
        "text": "Good morning!"
      }
    ]
  }
}
Sample output :
{
  "kind": "SentimentAnalysisResults",
  "results": {
    "documents": [
      {
        "id": "1",
        "sentiment": "positive",
        "confidenceScores": {
          "positive": 0.89,
          "neutral": 0.1,
          "negative": 0.01
        },
        "sentences": [
          {
            "sentiment": "positive",
            "confidenceScores": {
              "positive": 0.89,
              "neutral": 0.1,
              "negative": 0.01
            },
            "offset": 0,
            "length": 13,
            "text": "Good morning!"
          }
        ],
        "warnings": []
      }
    ],
    "errors": [],
    "modelVersion": "2022-11-01"
  }
}
Overall document sentiment is based on sentences:
- If all sentences are neutral, the overall sentiment is neutral.
- If sentence classifications include only positive and neutral, the overall sentiment is positive.
- If the sentence classifications include only negative and neutral, the overall sentiment is negative.
- If the sentence classifications include positive and negative, the overall sentiment is mixed.
Extract entities
Named Entity Recognition identifies entities that are mentioned in the text. Entities are grouped into categories and subcategories, for example:
- Person
- Location
- DateTime
- Organization
- Address
- URL
For a full list of categories, see the documentation.
Sample input:
{
  "kind": "EntityRecognition",
  "parameters": {
    "modelVersion": "latest"
  },
  "analysisInput": {
    "documents": [
      {
        "id": "1",
        "language": "en",
        "text": "Joe went to London on Saturday"
      }
    ]
  }
}
Sample Output:
{
    "kind": "EntityRecognitionResults",
     "results": {
          "documents":[
              {
                  "entities":[
                  {
                    "text":"Joe",
                    "category":"Person",
                    "offset":0,
                    "length":3,
                    "confidenceScore":0.62
                  },
                  {
                    "text":"London",
                    "category":"Location",
                    "subcategory":"GPE",
                    "offset":12,
                    "length":6,
                    "confidenceScore":0.88
                  },
                  {
                    "text":"Saturday",
                    "category":"DateTime",
                    "subcategory":"Date",
                    "offset":22,
                    "length":8,
                    "confidenceScore":0.8
                  }
                ],
                "id":"1",
                "warnings":[]
              }
          ],
          "errors":[],
          "modelVersion":"2021-01-15"
    }
}
Extract linked entities
Used when same name may be applicable for more than 1 entity
Entity linking can be used to disambiguate entities of the same name by referencing an article in a knowledge base. Wikipedia provides the knowledge base for the Text Analytics service. Specific article links are determined based on entity context within the text.
Sample input:
{
  "kind": "EntityLinking",
  "parameters": {
    "modelVersion": "latest"
  },
  "analysisInput": {
    "documents": [
      {
        "id": "1",
        "language": "en",
        "text": "I saw Venus shining in the sky"
      }
    ]
  }
}
Sample output:
{
  "kind": "EntityLinkingResults",
  "results": {
    "documents": [
      {
        "id": "1",
        "entities": [
          {
            "bingId": "89253af3-5b63-e620-9227-f839138139f6",
            "name": "Venus",
            "matches": [
              {
                "text": "Venus",
                "offset": 6,
                "length": 5,
                "confidenceScore": 0.01
              }
            ],
            "language": "en",
            "id": "Venus",
            "url": "https://en.wikipedia.org/wiki/Venus",
            "dataSource": "Wikipedia"
          }
        ],
        "warnings": []
      }
    ],
    "errors": [],
    "modelVersion": "2021-06-01"
  }
}
Create question answering solutions with Azure AI Language
Azure AI Language includes a question answering capability, which enables you to define a knowledge base of question and answer pairs that can be queried using natural language input. The knowledge base can be published to a REST endpoint and consumed by client applications, commonly bots.
The knowledge base can be created from existing sources, including:
- Web sites containing frequently asked question (FAQ) documentation.
- Files containing structured text, such as brochures or user guides.
- Built-in chit chat question and answer pairs that encapsulate common conversational exchanges.
Compare question answering to Azure AI Language understanding

Use a knowledge base
{
  "question": "What do I need to do to cancel a reservation?",
  "top": 2,
  "scoreThreshold": 20,
  "strictFilters": [
    {
      "name": "category",
      "value": "api"
    }
  ]
}
| Property | Description | | --- | --- | | question | Question to send to the knowledge base. | | top | Maximum number of answers to be returned. | | scoreThreshold | Score threshold for answers returned. | | strictFilters | Limit to only answers that contain the specified metadata. |
Output:
{
  "answers": [
    {
      "score": 27.74823341616769,
      "id": 20,
      "answer": "Call us on 555 123 4567 to cancel a reservation.",
      "questions": [
        "How can I cancel a reservation?"
      ],
      "metadata": [
        {
          "name": "category",
          "value": "api"
        }
      ]
    }
  ]
}
Improve question answering performance
-
Use Active learning
-
Use Synonyms
{
    "synonyms": [
        {
            "alterations": [
                "reservation",
                "booking"
                ]
        }
    ]
}
To learn more about synonyms, see the Improve quality of response with synonyms.
Extract Data from Forms with Form Recognizer
Azure Document Intelligence is a Vision API that extracts key-value pairs and table data from form documents.
Uses of the Azure Document Intelligence service include:
- Process automation
- Knowledge mining
- Industry-specific applications
What is Azure Document Intelligence?
Azure Document Intelligence uses Optical Character Recognition (OCR) capabilities and deep learning models to extract text, key-value pairs, selection marks, and tables from documents.
Azure Document Intelligence service components
Azure Document Intelligence is composed of the following services:
- Document analysis models: which take an input of JPEG, PNG, PDF, and TIFF files and return a JSON file with the location of text in bounding boxes, text content, tables, selection marks (also known as checkboxes or radio buttons), and document structure.
- Prebuilt models: which detect and extract information from document images and return the extracted data in a structured JSON output. Azure Document Intelligence currently supports prebuilt models for several forms, including:
- W-2 forms
- Invoices
- Receipts
- ID documents
- Business cards
- Custom models: custom models extract data from forms specific to your business. Custom models can be trained through the Azure Document Intelligence Studio.
Check out the documentation for quick start guides on all the available SDKs and the REST API.
Get started with Azure Document Intelligence
- Subscribe to a resource - Azure AI service resource (or) Azure Document intelligence resource
Understand Azure Document Intelligence file input requirements
- Format must be JPG, PNG, BMP, PDF (text or scanned), or TIFF.
- The file size must be less than 500 MB for paid (S0) tier and 4 MB for free (F0) tier.
- Image dimensions must be between 50 x 50 pixels and 10000 x 10000 pixels.
- The total size of the training data set must be 500 pages or less.
Deciding which component of azure document intelligence to use:
- To use OCR capabilities to capture document analysis, use the Layout model, Read model, or General Document model.
- To create an application that extracts data from W-2s, Invoices, Receipts, ID documents, Health insurance, vaccination, and business cards, use a prebuilt model. These models do not need to be trained. Azure Document Intelligence services analyze the documents and return a JSON output.
- To create an application to extract data from your industry-specific forms, create a custom model. This model needs to be trained on sample documents. After training, the custom model can analyze new documents and return a JSON output.
Training a Custom Model
To train a custom model:
- Store sample forms in an Azure blob container, along with JSON files containing layout and label field information.
- You can generate an ocr.json file for each sample form using the Azure Document Intelligence's Analyze document function. Additionally, you need a single fields.json file describing the fields you want to extract, and a labels.json file for each sample form mapping the fields to their location in that form.
- Generate a shared access security (SAS) URL for the container.
- Use the Build model REST API function (or equivalent SDK method).
- Use the Get model REST API function (or equivalent SDK method) to get the trained model ID.
OR
- Use the Azure Document Intelligence Studio to label and train. There are two types of underlying models for custom forms custom template models or custom neural models.
-
Custom template models accurately extract labeled key-value pairs, selection marks, tables, regions, and signatures from documents. Training only takes a few minutes, and more than 100 languages are supported.
-
Custom neural models are deep learned models that combine layout and language features to accurately extract labeled fields from documents.This model is best for semi-structured or unstructured documents.

-
Use Azure Document Intelligence models
Using the API
endpoint = "YOUR_DOC_INTELLIGENCE_ENDPOINT"
key = "YOUR_DOC_INTELLIGENCE_KEY"

model_id = "YOUR_CUSTOM_BUILT_MODEL_ID"
formUrl = "YOUR_DOCUMENT"

document_analysis_client = DocumentAnalysisClient(
    endpoint=endpoint, credential=AzureKeyCredential(key)
)

# Make sure your document's type is included in the list of document types the custom model can analyze
task = document_analysis_client.begin_analyze_document_from_url(model_id, formUrl)
result = task.result()
Sample output: Successful response has the analyzeResult key that contains the contents extracted and an array of pages containing info about the doc content.
{
	"status": "succeeded",
	"createdDateTime": "2023-10-18T23:39:50Z",
	"lastUpdatedDateTime": "2023-10-18T23:39:54Z",
	"analyzeResult": {
		"apiVersion": "2022-08-31",
		"modelId": "DocIntelModel",
		"stringIndexType": "utf16CodeUnit",
		"content": "Purchase Order\nHero Limited\nCompany Phone: 555-348-6512 Website: www.herolimited.com Email: accounts@herolimited.com\nPurchase Order\nDated As: 12/20/2020 Purchase Order #: 948284\nShipped To Vendor Name: Balozi Khamisi Company Name: Higgly Wiggly Books Address: 938 NE Burner Road Boulder City, CO 92848 Phone: 938-294-2949\nShipped From Name: Kidane Tsehaye Company Name: Jupiter Book Supply Address: 383 N Kinnick Road Seattle, WA 38383\nPhone: 932-299-0292\nDetails\nQuantity\nUnit Price\nTotal\nBindings\n20\n1.00\n20.00\nCovers Small\n20\n1.00\n20.00\nFeather Bookmark\n20\n5.00\n100.00\nCopper Swirl Marker\n20\n5.00\n100.00\nSUBTOTAL\n$140.00\nTAX\n$4.00\nTOTAL\n$144.00\nKidane Tsehaye\nManager\nKidane Tsehaye\nAdditional Notes: Do not Jostle Box. Unpack carefully. Enjoy. Jupiter Book Supply will refund you 50% per book if returned within 60 days of reading and offer you 25% off you next total purchase.",
		"pages": [
			{
				"pageNumber": 1,
				"angle": 0,
				"width": 1159,
				"height": 1486,
				"unit": "pixel",
				"words": [
					{
						"content": "Purchase",
						"polygon": [
							89,
							90,
							174,
							91,
							174,
							112,
							88,
							112
						],
						"confidence": 0.996,
						"span": {
							"offset": 0,
							"length": 8
						}
					},
					{
						"content": "Order",
						"polygon": [
							178,
							91,
							237,
							91,
							236,
							113,
							178,
							112
						],
						"confidence": 0.997,
						"span": {
							"offset": 9,
							"length": 5
						}
					},
                    ...
If the confidence values of the analyzeResult are low, try to improve the quality of your input documents.
confidence score of 80% or higher is acceptable for a low-risk application
This can be done via the SDKs or RestAPIs.
Plan an Azure AI Document Intelligence solution
Create an Azure AI Document Intelligence resource
To create an Azure AI Document Intelligence resource in Azure and obtain connection details, complete these steps:
- In the Azure portal, select Create a resource.
- In the Search services and marketplace box, type Document Intelligence and then press Enter.
- In the Document intelligence page, select Create.
- In the Create Document intelligence page, under Project Details, select your Subscription and either select an existing Resource group or create a new one.
- Under Instance details, select a Region near your users.
- In the Name textbox, type a unique name for the resource.
- Select a Pricing tier and then select Review + create.
- If the validation tests pass, select Create. Azure deploys the new Azure AI Document Intelligence resource.
Connect to Azure AI Document Intelligence
When you write an application that uses Azure AI Document Intelligence, you need two pieces of information to connect to the resource:
- Endpoint. This is the URL where the resource can be contacted.
- Access key. This is unique string that Azure uses to authenticate the call to Azure AI Document Intelligence.
To obtain these details:
- In the Azure portal, navigate to the Azure AI Document Intelligence resource.
- Under Resource Management, select Keys and Endpoint.
- Copy either KEY 1 or KEY 2 and the Endpoint values and store them for use in your application code.
The following code shows how to use these connection details to connect your application to Azure AI Document Intelligence. In this example, a sample document at a specified URL is submitted for analysis to the general document model. Replace <endpoint> and <access-key> with the connection details you obtained from the Azure portal:
from azure.core.credentials import AzureKeyCredential
from azure.ai.documentintelligence import DocumentIntelligenceClient
from azure.ai.documentintelligence.models import AnalyzeResult

endpoint = "<your-endpoint>"
key = "<your-key>"

docUrl = "<url-of-document-to-analyze>"

document_analysis_client = DocumentIntelligenceClient(endpoint=endpoint,
    credential=AzureKeyCredential(key))

poller = document_analysis_client.begin_analyze_document_from_url(
    "prebuilt-document", docUrl)
result: AnalyzeResult = poller.result()Summary :
- Read - gets all text
- General Document - Extract key-value pairs and tables
- Layout - extract text, tables and structured information from forms
If you're using the Standard pricing tier, you can add up to 100 custom models into a single composed model. If you're using the Free pricing tier, you can only add up to 5 custom models.
Create a knowledge store with Azure AI Search
https://learn.microsoft.com/en-us/training/modules/create-knowledge-store-azure-cognitive-search/
AI Search allows to create search solution in which a pipeline of AI skills is used to enrich data and populate an index. The data enrichments performed by the skills in the pipeline supplement the source data with insights such as:
- The language in which a document is written.
- Key phrases that might help determine the main themes or topics discussed in a document.
- A sentiment score that quantifies how positive or negative a document is.
- Specific locations, people, organizations, or landmarks mentioned in the content.
- AI-generated descriptions of images, or image text extracted by optical character recognition (OCR).
Knowledge Stores
While the index might be considered the primary output from an indexing process, the enriched data it contains might also be useful in other ways. For example:
- Since the index is essentially a collection of JSON objects, each representing an indexed record, it might be useful to export the objects as JSON files for integration into a data orchestration process using tools such as Azure Data Factory.
- You may want to normalize the index records into a relational schema of tables for analysis and reporting with tools such as Microsoft Power BI.
- Having extracted embedded images from documents during the indexing process, you might want to save those images as files.
Azure AI Search supports these scenarios by enabling you to define a knowledge store in the skillset that encapsulates your enrichment pipeline. The knowledge store consists of projections of the enriched data, which can be JSON objects, tables, or image files. When an indexer runs the pipeline to create or update an index, the projections are generated and persisted in the knowledge store.
Define Projections
The projections of data to be stored in your knowledge store are based on the document structures generated by the enrichment pipeline in your indexing process. Each skill in your skillset iteratively builds a JSON representation of the enriched data for the documents being indexed, and you can persist some or all of the fields in the document as projections.
Using the Shaper Skill
The process of indexing incrementally creates a complex document that contains the various output fields from the skills in the skillset. This can result in a schema that is difficult to work with, and which includes collections of primitive data values that don't map easily to well-formed JSON.
To simplify the mapping of these field values to projections in a knowledge store, it's common to use the Shaper skill to create a new, field containing a simpler structure for the fields you want to map to projections.
For example, consider the following Shaper skill definition:
{
  "@odata.type": "#Microsoft.Skills.Util.ShaperSkill",
  "name": "define-projection",
  "description": "Prepare projection fields",
  "context": "/document",
  "inputs": [
    {
      "name": "file_name",
      "source": "/document/metadata_content_name"
    },
    {
      "name": "url",
      "source": "/document/url"
    },
    {
      "name": "sentiment",
      "source": "/document/sentimentScore"
    },
    {
      "name": "key_phrases",
      "source": null,
      "sourceContext": "/document/merged_content/keyphrases/*",
      "inputs": [
        {
          "name": "phrase",
          "source": "/document/merged_content/keyphrases/*"
        }
      ]
    }
  ],
  "outputs": [
    {
      "name": "output",
      "targetName": "projection"
    }
  ]
}
Output Projection:
{
    "file_name": "file_name.pdf",
    "url": "https://<storage_path>/file_name.pdf",
    "sentiment": 1.0,
    "key_phrases": [
        {
            "phrase": "first key phrase"
        },
        {
            "phrase": "second key phrase"
        },
        {
            "phrase": "third key phrase"
        },
        ...
    ]
}
The resulting JSON document is well-formed, and easier to map to a projection in a knowledge store than the more complex document that has been built iteratively by the previous skills in the enrichment pipeline.
Defining a Knowledge Store
To define the knowledge store and the projections you want to create in it, you must create a knowledgeStore object in the skillset that specifies the Azure Storage connection string for the storage account where you want to create projections, and the definitions of the projections themselves.
You can define object projections, table projections, and file projections depending on what you want to store; however note that you must define a separate projection for each type of projection, even though each projection contains lists for tables, objects, and files. Projection types are mutually exclusive in a projection definition, so only one of the projection type lists can be populated. If you create all three kinds of projection, you must include a projection for each type; as shown here:
"knowledgeStore": {
      "storageConnectionString": "<storage_connection_string>",
      "projections": [
        {
            "objects": [
                {
                "storageContainer": "<container>",
                "source": "/projection"
                }
            ],
            "tables": [],
            "files": []
        },
        {
            "objects": [],
            "tables": [
                {
                "tableName": "KeyPhrases",
                "generatedKeyName": "keyphrase_id",
                "source": "projection/key_phrases/*",
                },
                {
                "tableName": "docs",
                "generatedKeyName": "document_id",
                "source": "/projection"
                }
            ],
            "files": []
        },
        {
            "objects": [],
            "tables": [],
            "files": [
                {
                "storageContainer": "<container>",
                "source": "/document/normalized_images/*"
                }
            ]
        }
    ]
 }
For object and file projections, the specified container will be created if it does not already exist. An Azure Storage table will be created for each table projection, with the mapped fields and a unique key field with the name specified in the generatedKeyName property. These key fields can be used to define relational joins between the tables for analysis and reporting.
Summary
- Object projections are JSON representations of the indexed documents.
- File projections are JPEG files containing image data extracted from documents.
- Table projections create a relational schema for the extracted data.
Create a custom skill for Azure AI Search
Creating a Custom Skill
Input Schema : The input for a custom skill defines a JSON structure containing a record for each document to be processed. Each Document has a unique identified, ans a data payload with one or more inputs, like this:
{
    "values": [
      {
        "recordId": "<unique_identifier>",
        "data":
           {
             "<input1_name>":  "<input1_value>",
             "<input2_name>": "<input2_value>",
             ...
           }
      },
      {
        "recordId": "<unique_identifier>",
        "data":
           {
             "<input1_name>":  "<input1_value>",
             "<input2_name>": "<input2_value>",
             ...
           }
      },
      ...
    ]
}
Output Schema:
{
    "values": [
      {
        "recordId": "<unique_identifier_from_input>",
        "data":
           {
             "<output1_name>":  "<output1_value>",
              ...
           },
         "errors": [...],
         "warnings": [...]
      },
      {
        "recordId": "< unique_identifier_from_input>",
        "data":
           {
             "<output1_name>":  "<output1_value>",
              ...
           },
         "errors": [...],
         "warnings": [...]
      },
      ...
    ]
}
Add Custom Skill to a skillset
To integrate a custom skill into your indexing solution, you must add a skill for it to a skillset using the Custom.WebApiSkill skill type.
The skill definition must:
- Specify the URI to your web API endpoint, including parameters and headers if necessary.
- Set the context to specify at which point in the document hierarchy the skill should be called
- Assign input values, usually from existing document fields
- Store output in a new field, optionally specifying a target field name (otherwise the output name is used)
{
    "skills": [
      ...,
      {
        "@odata.type": "#Microsoft.Skills.Custom.WebApiSkill",
        "description": "<custom skill description>",
        "uri": "https://<web_api_endpoint>?<params>",
        "httpHeaders": {
            "<header_name>": "<header_value>"
        },
        "context": "/document/<where_to_apply_skill>",
        "inputs": [
          {
            "name": "<input1_name>",
            "source": "/document/<path_to_input_field>"
          }
        ],
        "outputs": [
          {
            "name": "<output1_name>",
            "targetName": "<optional_field_name>"
          }
        ]
      }
  ]
}
Create an Azure AI Search solution
https://learn.microsoft.com/en-us/training/modules/create-azure-cognitive-search-solution/
Azure AI Search provides a cloud-based solution for indexing and querying a wide range of data sources, and creating comprehensive and high-scale search solutions. With Azure AI Search, you can:
- Index documents and data from a range of sources.
- Use cognitive skills to enrich index data.
- Store extracted insights in a knowledge store for analysis and integration.
By the end of this module, you'll learn how to:
- Create an Azure AI Search solution
- Develop a search application
Manage Capacity
Service Tiers and Capacity Management
- Free (F). Use this tier to explore the service or try the tutorials in the product documentation.
- Basic (B): Use this tier for small-scale search solutions that include a maximum of 15 indexes and 2 GB of index data.
- Standard (S): Use this tier for enterprise-scale solutions. There are multiple variants of this tier, including S, S2, and S3; which offer increasing capacity in terms of indexes and storage, and S3HD, which is optimized for fast read performance on smaller numbers of indexes.
- Storage Optimized (L): Use a storage optimized tier (L1 or L2) when you need to create large indexes, at the cost of higher query latency.
Replicas and Partitions
Depending on the pricing tier you select, you can optimize your solution for scalability and availability by creating replicas and partitions.
- Replicas are instances of the search service - you can think of them as nodes in a cluster. Increasing the number of replicas can help ensure there is sufficient capacity to service multiple concurrent query requests while managing ongoing indexing operations.
- Partitions are used to divide an index into multiple storage locations, enabling you to split I/O operations such as querying or rebuilding an index.
The combination of replicas and partitions you configure determines the search units used by your solution. Put simply, the number of search units is the number of replicas multiplied by the number of partitions (R x P = SU). For example, a resource with four replicas and three partitions is using 12 search units. You can learn more about pricing tiers and capacity management in the Azure AI Search documentation.
Understanding Search Components
4 components - Data Source, Skillset, Indexer, Index
Data source
Most search solutions start with a data source containing the data you want to search. Azure AI Search supports multiple types of data source, including:
- Unstructured files in Azure blob storage containers.
- Tables in Azure SQL Database.
- Documents in Cosmos DB.
Azure AI Search can pull data from these data sources for indexing.
Alternatively, applications can push JSON data directly into an index, without pulling it from an existing data store.
Skillset
In a basic search solution, you might index the data extracted from the data source. The information that can be extracted depends on the data source. For example, when indexing data in a database, the fields in the database tables might be extracted; or when indexing a set of documents, file metadata such as file name, modified date, size, and author might be extracted along with the text content of the document.
While a basic search solution that indexes data values extracted directly from the data source can be useful, the expectations of modern application users have driven a need for richer insights into the data. In Azure AI Search, you can apply artificial intelligence (AI) skills as part of the indexing process to enrich the source data with new information, which can be mapped to index fields. The skills used by an indexer are encapsulated in a skillset that defines an enrichment pipeline in which each step enhances the source data with insights obtained by a specific AI skill. Examples of the kind of information that can be extracted by an AI skill include:
- The language in which a document is written.
- Key phrases that might help determine the main themes or topics discussed in a document.
- A sentiment score that quantifies how positive or negative a document is.
- Specific locations, people, organizations, or landmarks mentioned in the content.
- AI-generated descriptions of images, or image text extracted by optical character recognition.
- Custom skills that you develop to meet specific requirements.
Indexer
The indexer is the engine that drives the overall indexing process. It takes the outputs extracted using the skills in the skillset, along with the data and metadata values extracted from the original data source, and maps them to fields in the index.
An indexer is automatically run when it is created, and can be scheduled to run at regular intervals or run on demand to add more documents to the index. In some cases, such as when you add new fields to an index or new skills to a skillset, you may need to reset the index before re-running the indexer.
Index
The index is the searchable result of the indexing process. It consists of a collection of JSON documents, with fields that contain the values extracted during indexing. Client applications can query the index to retrieve, filter, and sort information.
Each index field can be configured with the following attributes:
- key: Fields that define a unique key for index records.
- searchable: Fields that can be queried using full-text search.
- filterable: Fields that can be included in filter expressions to return only documents that match specified constraints.
- sortable: Fields that can be used to order the results.
- facetable: Fields that can be used to determine values for facets (user interface elements used to filter the results based on a list of known field values).
- retrievable: Fields that can be included in search results (by default, all fields are retrievable unless this attribute is explicitly removed).
Understanding the indexing Process
The indexing process works by creating a document for each indexed entity. During indexing, an enrichment pipeline iteratively builds the documents that combine metadata from the data source with enriched fields extracted by cognitive skills. You can think of each indexed document as a JSON structure, which initially consists of a document with the index fields you have mapped to fields extracted directly from the source data, like this:
- document
- metadata_storage_name
- metadata_author
- content
When the documents in the data source contain images, you can configure the indexer to extract the image data and place each image in a normalized_images collection, like this:
- document
- metadata_storage_name
- metadata_author
- content
- normalized_images
- image0
- image1
Each skill adds fields to the document, so for example a skill that detects the language in which a document is written might store its output in a language field, like this:
- document
- metadata_storage_name
- metadata_author
- content
- normalized_images
- image0
- image1
- language
For example, you could run an optical character recognition (OCR) skill for each image in the normalized images collection to extract any text they contain:
- document
- metadata_storage_name
- metadata_author
- content
- normalized_images
- image0
- Text
- image1
- Text
- image0
- language
The output fields from each skill can be used as inputs for other skills later in the pipeline, which in turn store their outputs in the document structure. For example, we could use a merge skill to combine the original text content with the text extracted from each image to create a new merged_content field that contains all of the text in the document, including image text.
- document
- metadata_storage_name
- metadata_author
- content
- normalized_images
- image0
- Text
- image1
- Text
- image0
- language
- merged_content
The fields in the final document structure at the end of the pipeline are mapped to index fields by the indexer in one of two ways:
- Fields extracted directly from the source data are all mapped to index fields. These mappings can be implicit (fields are automatically mapped to in fields with the same name in the index) or explicit (a mapping is defined to match a source field to an index field, often to rename the field to something more useful or to apply a function to the data value as it is mapped).
- Output fields from the skills in the skillset are explicitly mapped from their hierarchical location in the output to the target field in the index.
Search an index
Full Text Search
Full text search describes search solutions that parse text-based document contents to find query terms. Full text search queries in Azure AI Search are based on the Lucene query syntax, which provides a rich set of query operations for searching, filtering, and sorting data in indexes. Azure AI Search supports two variants of the Lucene syntax:
- Simple - An intuitive syntax that makes it easy to perform basic searches that match literal query terms submitted by a user.
- Full - An extended syntax that supports complex filtering, regular expressions, and other more sophisticated queries.
Client applications submit queries to Azure AI Search by specifying a search expression along with other parameters that determine how the expression is evaluated and the results returned. Some common parameters submitted with a query include:
- search - A search expression that includes the terms to be found.
- queryType - The Lucene syntax to be evaluated (simple or full).
- searchFields - The index fields to be searched.
- select - The fields to be included in the results.
- searchMode - Criteria for including results based on multiple search terms. For example, suppose you search for comfortable hotel. A searchMode value of Any returns documents that contain "comfortable", "hotel", or both; while a searchMode value of All restricts results to documents that contain both "comfortable" and "hotel".
Query processing consists of four stages:
- Query parsing. The search expression is evaluated and reconstructed as a tree of appropriate subqueries. Subqueries might include term queries (finding specific individual words in the search expression - for example hotel), phrase queries (finding multi-term phrases specified in quotation marks in the search expression - for example, "free parking"), and prefix queries (finding terms with a specified prefix - for example air*, which would match airway, air-conditioning, and airport).
- Lexical analysis - The query terms are analyzed and refined based on linguistic rules. For example, text is converted to lower case and nonessential stopwords (such as "the", "a", "is", and so on) are removed. Then words are converted to their root form (for example, "comfortable" might be simplified to "comfort") and composite words are split into their constituent terms.
- Document retrieval - The query terms are matched against the indexed terms, and the set of matching documents is identified.
- Scoring - A relevance score is assigned to each result based on a term frequency/inverse document frequency (TF/IDF) calculation.
Apply Filtering and Sorting
Filtering Results
You can apply filters to queries in two ways:
- By including filter criteria in a simple search expression.
- By providing an OData filter expression as a $filter parameter with a full syntax search expression.
suppose you want to find documents containing the text London that have an author field value of Reviewer.
search=London+author='Reviewer'
queryType=Simple
Using OData
search=London
$filter=author eq 'Reviewer'
queryType=Full
Odata $filter expressions are case sensititve
Filtering by fields:
search=*
facet=author

or

search=*
$filter=author eq 'selected-facet-value-here'
Sorting Results
search=*
$orderby=last_modified desc
You need to make use of the orderby
Enhance the index
Search as you type
By adding a suggester to an index, you can enable two forms of search-as-you-type experience to help users find relevant results more easily:
- Suggestions - retrieve and display a list of suggested results as the user types into the search box, without needing to submit the search query.
- Autocomplete - complete partially typed search terms based on values in index fields.
To implement one or both of these capabilities, create or update an index, defining a suggester for one or more fields.
After you've added a suggester, you can use the suggestion and autocomplete REST API endpoints or the .NET DocumentsOperationsExtensions.Suggest and DocumentsOperationsExtensions.Autocomplete methods to submit a partial search term and retrieve a list of suggested results or autocompleted terms to display in the user interface.
Custom Scoring and Result Boosting
Relevance score is calculated based on term-frequency/inverse-document-frequency (TF/IDF) algorithm.
You can customize the way this score is calculated by defining a scoring profile that applies a weighting value to specific fields - essentially increasing the search score for documents when the search term is found in those fields. Additionally, you can boost results based on field values - for example, increasing the relevancy score for documents based on how recently they were modified or their file size.
Synonyms
To help users find the information they need, you can define synonym maps that link related terms together. You can then apply those synonym maps to individual fields in an index, so that when a user searches for a particular term, documents with fields that contain the term or any of its synonyms will be included in the results.
Additional Points
To enable a field to be included in the results, you must make it retrievable.
- A data source where the data to be indexed is stored (though you can also push data directly into an index by using the API).
- A skillset that defines and enrichment pipeline of cognitive skills to enrich the index data.
- An index that defines fields, which the user can query.
- An indexer that populates the fields in the index with values extracted from the source data.
Translate speech with the Azure AI Speech service
https://learn.microsoft.com/en-us/training/modules/translate-speech-speech-service/
To use translation via the SDk, you need:
- The location in which the resource is deployed (for example, eastus)
- One of the keys assigned to your resource.
Translate Speech to Text

- Use a SpeechTranslationConfig object to encapsulate the information required to connect to your Azure AI Speech resource. Specifically, its location and key.
- The SpeechTranslationConfig object is also used to specify the speech recognition language (the language in which the input speech is spoken) and the target languages into which it should be translated.
- Optionally, use an AudioConfig to define the input source for the audio to be transcribed. By default, this is the default system microphone, but you can also specify an audio file.
- Use the SpeechTranslationConfig, and AudioConfig to create a TranslationRecognizer object. This object is a proxy client for the Azure AI Speech translation API.
- Use the methods of the TranslationRecognizer object to call the underlying API functions. For example, the RecognizeOnceAsync() method uses the Azure AI Speech service to asynchronously translate a single spoken utterance.
- Process the response from Azure AI Speech. In the case of the RecognizeOnceAsync() method, the result is a SpeechRecognitionResult object that includes the following properties:
- Duration
- OffsetInTicks
- Properties
- Reason
- ResultId
- Text
- Translations
If the operation was successful, the Reason property has the enumerated value RecognizedSpeech, the Text property contains the transcription in the original language. You can also access a Translations property which contains a dictionary of the translations (using the two-character ISO language code, such as "en" for English, as a key).
Synthesize Translations
The TranslationRecognizer returns translated transcriptions of spoken input - essentially translating audible speech to text.
You can also synthesize the translation as speech to create speech-to-speech translation solutions. There are two ways you can accomplish this.
You can only use event-based synthesis when translating to a single target language.
Event-based synthesis
When you want to perform 1:1 translation (translating from one source language into a single target language), you can use event-based synthesis to capture the translation as an audio stream. To do this, you need to:
Specify the desired voice for the translated speech in the TranslationConfig. Create an event handler for the TranslationRecognizer object's Synthesizing event. In the event handler, use the GetAudio() method of the Result parameter to retrieve the byte stream of translated audio. The specific code used to implement an event handler varies depending on the programming language you're using. See the C# and Python examples in the Speech SDK documentation.
Manual synthesis
Manual synthesis is an alternative approach to event-based synthesis that doesn't require you to implement an event handler. You can use manual synthesis to generate audio translations for one or more target languages.
Manual synthesis of translations is essentially just the combination of two separate operations in which you:
- Use a TranslationRecognizer to translate spoken input into text transcriptions in one or more target languages.
- Iterate through the Translations dictionary in the result of the translation operation, using a SpeechSynthesizer to synthesize an audio stream for each language.
Create speech-enabled apps with Azure AI services
https://learn.microsoft.com/en-us/training/modules/create-speech-enabled-apps/
Azure AI Speech provides APIs that you can use to build speech-enabled applications. This includes:
- Speech to text: An API that enables speech recognition in which your application can accept spoken input.
- Text to speech: An API that enables speech synthesis in which your application can provide spoken output.
- Speech Translation: An API that you can use to translate spoken input into multiple languages.
- Speaker Recognition: An API that enables your application to recognize individual speakers based on their voice.
- Intent Recognition: An API that uses conversational language understanding to determine the semantic meaning of spoken input.
Provision an Azure Resource for Speech
Create a resource. To use the SDK you need the following:
- Location in which teh resource is deployed
- One of the keys assigned to your resource
Use the Azure AI Speech to Text API
The Azure AI Speech service supports speech recognition through two REST APIs:
- The Speech to text API, which is the primary way to perform speech recognition.
- The Speech to text Short Audio API, which is optimized for short streams of audio (up to 60 seconds).
You can use either API for interactive speech recognition, depending on the expected length of the spoken input. You can also use the Speech to text API for batch transcription, transcribing multiple audio files to text as a batch operation.
You can learn more about the REST APIs in the Speech to text REST API documentation. In practice, most interactive speech-enabled applications use the Speech service through a (programming) language-specific SDK.
Using the Azure AI Speech SDK
While the specific details vary, depending on the SDK being used (Python, C#, and so on); there's a consistent pattern for using the Speech to text API:
- Use a SpeechConfig object to encapsulate the information required to connect to your Azure AI Speech resource. Specifically, its location and key.
- Optionally, use an AudioConfig to define the input source for the audio to be transcribed. By default, this is the default system microphone, but you can also specify an audio file.
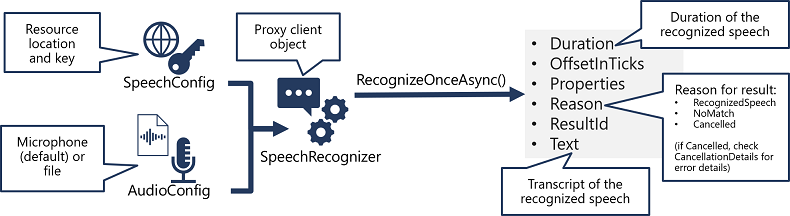
- Use the SpeechConfig and AudioConfig to create a SpeechRecognizer object. This object is a proxy client for the Speech to text API.
- Use the methods of the SpeechRecognizer object to call the underlying API functions. For example, the RecognizeOnceAsync() method uses the Azure AI Speech service to asynchronously transcribe a single spoken utterance.
- Process the response from the Azure AI Speech service. In the case of the RecognizeOnceAsync() method, the result is a SpeechRecognitionResult object that includes the following properties:
- Duration
- OffsetInTicks
- Properties
- Reason
- ResultId
- Text
If the operation was successful, the Reason property has the enumerated value RecognizedSpeech, and the Text property contains the transcription. Other possible values for Result include NoMatch (indicating that the audio was successfully parsed but no speech was recognized) or Canceled, indicating that an error occurred (in which case, you can check the Properties collection for the CancellationReason property to determine what went wrong).
Using the Azure AI Speech SDK
As with speech recognition, in practice most interactive speech-enabled applications are built using the Azure AI Speech SDK.
The pattern for implementing speech synthesis is similar to that of speech recognition:
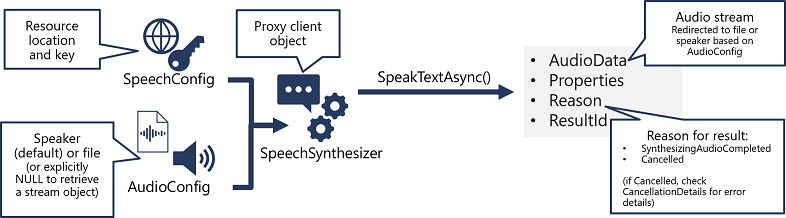
- Use a SpeechConfig object to encapsulate the information required to connect to your Azure AI Speech resource. Specifically, its location and key.
- Optionally, use an AudioConfig to define the output device for the speech to be synthesized. By default, this is the default system speaker, but you can also specify an audio file, or by explicitly setting this value to a null value, you can process the audio stream object that is returned directly.
- Use the SpeechConfig and AudioConfig to create a SpeechSynthesizer object. This object is a proxy client for the Text to speech API.
- Use the methods of the SpeechSynthesizer object to call the underlying API functions. For example, the SpeakTextAsync() method uses the Azure AI Speech service to convert text to spoken audio.
- Process the response from the Azure AI Speech service. In the case of the SpeakTextAsync method, the result is a SpeechSynthesisResult object that contains the following properties:
- AudioData
- Properties
- Reason
- ResultId
When speech has been successfully synthesized, the Reason property is set to the SynthesizingAudioCompleted enumeration and the AudioData property contains the audio stream (which, depending on the AudioConfig may have been automatically sent to a speaker or file).
Configure Audio Format and Voices
When synthesizing speech, you can use a SpeechConfig object to customize the audio that is returned by the Azure AI Speech service.
Audio format
The Azure AI Speech service supports multiple output formats for the audio stream that is generated by speech synthesis. Depending on your specific needs, you can choose a format based on the required:
- Audio file type
- Sample-rate
- Bit-depth
The supported formats are indicated in the SDK using the SpeechSynthesisOutputFormat enumeration. For example, SpeechSynthesisOutputFormat.Riff24Khz16BitMonoPcm.
To specify the required output format, use the SetSpeechSynthesisOutputFormat method of the SpeechConfig object:
C#Copy
speechConfig.SetSpeechSynthesisOutputFormat(SpeechSynthesisOutputFormat.Riff24Khz16BitMonoPcm);
For a full list of supported formats and their enumeration values, see the Azure AI Speech SDK documentation.
Voices
The Azure AI Speech service provides multiple voices that you can use to personalize your speech-enabled applications. There are two kinds of voice that you can use:
- Standard voices - synthetic voices created from audio samples.
- Neural voices - more natural sounding voices created using deep neural networks.
Voices are identified by names that indicate a locale and a person's name - for example en-GB-George.
To specify a voice for speech synthesis in the SpeechConfig, set its SpeechSynthesisVoiceName property to the voice you want to use:
C#Copy
speechConfig.SpeechSynthesisVoiceName = "en-GB-George";
For information about voices, see the Azure AI Speech SDK documentation.
Use Speech Synthesis Markup Language
While the Azure AI Speech SDK enables you to submit plain text to be synthesized into speech (for example, by using the SpeakTextAsync() method), the service also supports an XML-based syntax for describing characteristics of the speech you want to generate. This Speech Synthesis Markup Language (SSML) syntax offers greater control over how the spoken output sounds, enabling you to:
- Specify a speaking style, such as "excited" or "cheerful" when using a neural voice.
- Insert pauses or silence.
- Specify phonemes (phonetic pronunciations), for example to pronounce the text "SQL" as "sequel".
- Adjust the prosody of the voice (affecting the pitch, timbre, and speaking rate).
- Use common "say-as" rules, for example to specify that a given string should be expressed as a date, time, telephone number, or other form.
- Insert recorded speech or audio, for example to include a standard recorded message or simulate background noise.
For example, consider the following SSML:
XMLCopy
<speak version="1.0" xmlns="http://www.w3.org/2001/10/synthesis"
                     xmlns:mstts="https://www.w3.org/2001/mstts" xml:lang="en-US">
    <voice name="en-US-AriaNeural">
        <mstts:express-as style="cheerful">
          I say tomato
        </mstts:express-as>
    </voice>
    <voice name="en-US-GuyNeural">
        I say <phoneme alphabet="sapi" ph="t ao m ae t ow"> tomato </phoneme>.
        <break strength="weak"/>Lets call the whole thing off!
    </voice>
</speak>
This SSML specifies a spoken dialog between two different neural voices, like this:
- Ariana (cheerfully): "I say tomato:
- Guy: "I say tomato (pronounced tom-ah-toe) ... Let's call the whole thing off!"
To submit an SSML description to the Speech service, you can use the SpeakSsmlAsync() method, like this:
C#Copy
speechSynthesizer.SpeakSsmlAsync(ssml_string);
For more information about SSML, see the Azure AI Speech SDK documentation.
Translate text with Azure AI Translator service
https://learn.microsoft.com/en-us/training/modules/translate-text-with-translator-service/
Custom named entity recognition
https://learn.microsoft.com/en-us/training/modules/custom-name-entity-recognition/
An entity is a person, place, thing, event, skill, or value.
Custom vs Built-in NER
<YOUR-ENDPOINT>/language/analyze-text/jobs?api-version=<API-VERSION>| Placeholder | Value | Example | | --- | --- | --- | | | The endpoint for your API request | https://.cognitiveservices.azure.com | | | The version of the API you are calling | 2023-05-01 |
The body contains several documents.
Sample response:
<...>
"entities":[
    {
        "text":"Seattle",
        "category":"Location",
        "subcategory":"GPE",
        "offset":45,
        "length":7,
        "confidenceScore":0.99
    },
    {
        "text":"next week",
        "category":"DateTime",
        "subcategory":"DateRange",
        "offset":104,
        "length":9,
        "confidenceScore":0.8
    }
]
<...>
A full list of recognized entity categories is available in the NER docs.
Examples of when you'd want custom NER include specific legal or bank data, knowledge mining to enhance catalog search, or looking for specific text for audit policies. Each one of these projects requires a specific set of entities and data it needs to extract.
Azure AI Language Project Life Cycle

Creating an entity extraction model typically follows a similar path to most Azure AI Language service features:
- Define entities: Understanding the data and entities you want to identify, and try to make them as clear as possible. For example, defining exactly which parts of a bank statement you want to extract.
- Tag data: Label, or tag, your existing data, specifying what text in your dataset corresponds to which entity. This step is important to do accurately and completely, as any wrong or missed labels will reduce the effectiveness of the trained model. A good variation of possible input documents is useful. For example, label bank name, customer name, customer address, specific loan or account terms, loan or account amount, and account number.
- Train model: Train your model once your entities are labeled. Training teaches your model how to recognize the entities you label.
- View model: After your model is trained, view the results of the model. This page includes a score of 0 to 1 that is based on the precision and recall of the data tested. You can see which entities worked well (such as customer name) and which entities need improvement (such as account number).
- Improve model: Improve your model by seeing which entities failed to be identified, and which entities were incorrectly extracted. Find out what data needs to be added to your model's training to improve performance. This page shows you how entities failed, and which entities (such as account number) need to be differentiated from other similar entities (such as loan amount).
- Deploy model: Once your model performs as desired, deploy your model to make it available via the API. In our example, you can send to requests to the model when it's deployed to extract bank statement entities.
- Extract entities: Use your model for extracting entities. The lab covers how to use the API, and you can view the API reference for more details.
Considerations for Data selection and refining entities
For the best performance, you'll need to use both high quality data to train the model and clearly defined entity types.
High quality data will let you spend less time refining and yield better results from your model.
- Diversity - use as diverse of a dataset as possible without losing the real-life distribution expected in the real data. You'll want to use sample data from as many sources as possible, each with their own formats and number of entities. It's best to have your dataset represent as many different sources as possible.
- Distribution - use the appropriate distribution of document types. A more diverse dataset to train your model will help your model avoid learning incorrect relationships in the data.
- Accuracy - use data that is as close to real world data as possible. Fake data works to start the training process, but it likely will differ from real data in ways that can cause your model to not extract correctly.
Entities need to also be carefully considered, and defined as distinctly as possible. Avoid ambiguous entities (such as two names next to each other on a bank statement), as it will make the model struggle to differentiate. If having some ambiguous entities is required, make sure to have more examples for your model to learn from so it can understand the difference.
Keeping your entities distinct will also go a long way in helping your model's performance. For example, trying to extract something like "Contact info" that could be a phone number, social media handle, or email address would require several examples to correctly teach your model. Instead, try to break them down into more specific entities such as "Phone", "Email", and "Social media" and let the model label whichever type of contact information it finds.
How to extract entities
To submit an extraction task, the API requires the JSON body to specify which task to execute. For custom NER, the task for the JSON payload is CustomEntityRecognition.
Your payload will look similar to the following JSON:
{
    "displayName": "string",
    "analysisInput": {
        "documents": [
            {
                "id": "doc1",
                "text": "string"
            },
            {
                "id": "doc2",
                "text": "string"
            }
        ]
    },
    "tasks": [
        {
            "kind": "CustomEntityRecognition",
            "taskName": "MyRecognitionTaskName",
            "parameters": {
            "projectName": "MyProject",
            "deploymentName": "MyDeployment"
            }
        }
    ]
}
Project Limits
The Azure AI Language service enforces the following restrictions:
- Training - at least 10 files, and not more than 100,000
- Deployments - 10 deployment names per project
- APIs
- Authoring - this API creates a project, trains, and deploys your model. Limited to 10 POST and 100 GET per minute
- Analyze - this API does the work of actually extracting the entities; it requests a task and retrieves the results. Limited to 20 GET or POST
- Projects - only 1 storage account per project, 500 projects per resource, and 50 trained models per project
- Entities - each entity can be up to 500 characters. You can have up to 200 entity types.
See the Service limits for Azure AI Language page for detailed information.
Label Your Data
Labeling, or tagging, your data correctly is an important part of the process to create a custom entity extraction model. Labels identify examples of specific entities in text used to train the model. Three things to focus on are:
- Consistency - Label your data the same way across all files for training. Consistency allows your model to learn without any conflicting inputs.
- Precision - Label your entities consistently, without unnecessary extra words. Precision ensures only the correct data is included in your extracted entity.
- Completeness - Label your data completely, and don't miss any entities. Completeness helps your model always recognize the entities present.
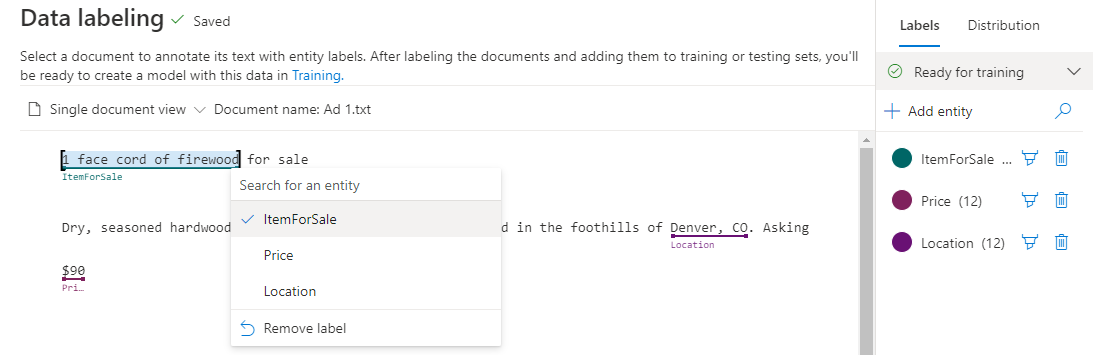
How to label your data
Language Studio is the most straight forward method for labeling your data. Language Studio allows you to see the file, select the beginning and end of your entity, and specify which entity it is.
Each label that you identify gets saved into a file that lives in your storage account with your dataset, in an auto-generated JSON file. This file then gets used by the model to learn how to extract custom entities. It's possible to provide this file when creating your project (if you're importing the same labels from a different project, for example) however it must be in the Accepted custom NER data formats. For example:
JSONCopy
{
  "projectFileVersion": "{DATE}",
  "stringIndexType": "Utf16CodeUnit",
  "metadata": {
    "projectKind": "CustomEntityRecognition",
    "storageInputContainerName": "{CONTAINER-NAME}",
    "projectName": "{PROJECT-NAME}",
    "multilingual": false,
    "description": "Project-description",
    "language": "en-us",
    "settings": {}
  },
  "assets": {
    "projectKind": "CustomEntityRecognition",
    "entities": [
      {
        "category": "Entity1"
      },
      {
        "category": "Entity2"
      }
    ],
    "documents": [
      {
        "location": "{DOCUMENT-NAME}",
        "language": "{LANGUAGE-CODE}",
        "dataset": "{DATASET}",
        "entities": [
          {
            "regionOffset": 0,
            "regionLength": 500,
            "labels": [
              {
                "category": "Entity1",
                "offset": 25,
                "length": 10
              },
              {
                "category": "Entity2",
                "offset": 120,
                "length": 8
              }
            ]
          }
        ]
      },
      {
        "location": "{DOCUMENT-NAME}",
        "language": "{LANGUAGE-CODE}",
        "dataset": "{DATASET}",
        "entities": [
          {
            "regionOffset": 0,
            "regionLength": 100,
            "labels": [
              {
                "category": "Entity2",
                "offset": 20,
                "length": 5
              }
            ]
          }
        ]
      }
    ]
  }
}
Expand table
| Field | Description | | --- | --- | | documents | Array of labeled documents | | location | Path to file within container connected to the project | | language | Language of the file | | entities | Array of present entities in the current document | | regionOffset | Inclusive character position for start of text | | regionLength | Length in characters of the data used in training | | category | Name of entity to extract | | labels | Array of labeled entities in the files | | offset | Inclusive character position for start of entity | | length | Length in characters of the entity | | dataset | Which dataset the file is assigned to |
Train and evaluate your model
Training and evaluating your model is an iterative process of adding data and labels to your training dataset to teach the model more accurately. To know what types of data and labels need to be improved, Language Studio provides scoring in the View model details page on the left hand pane.
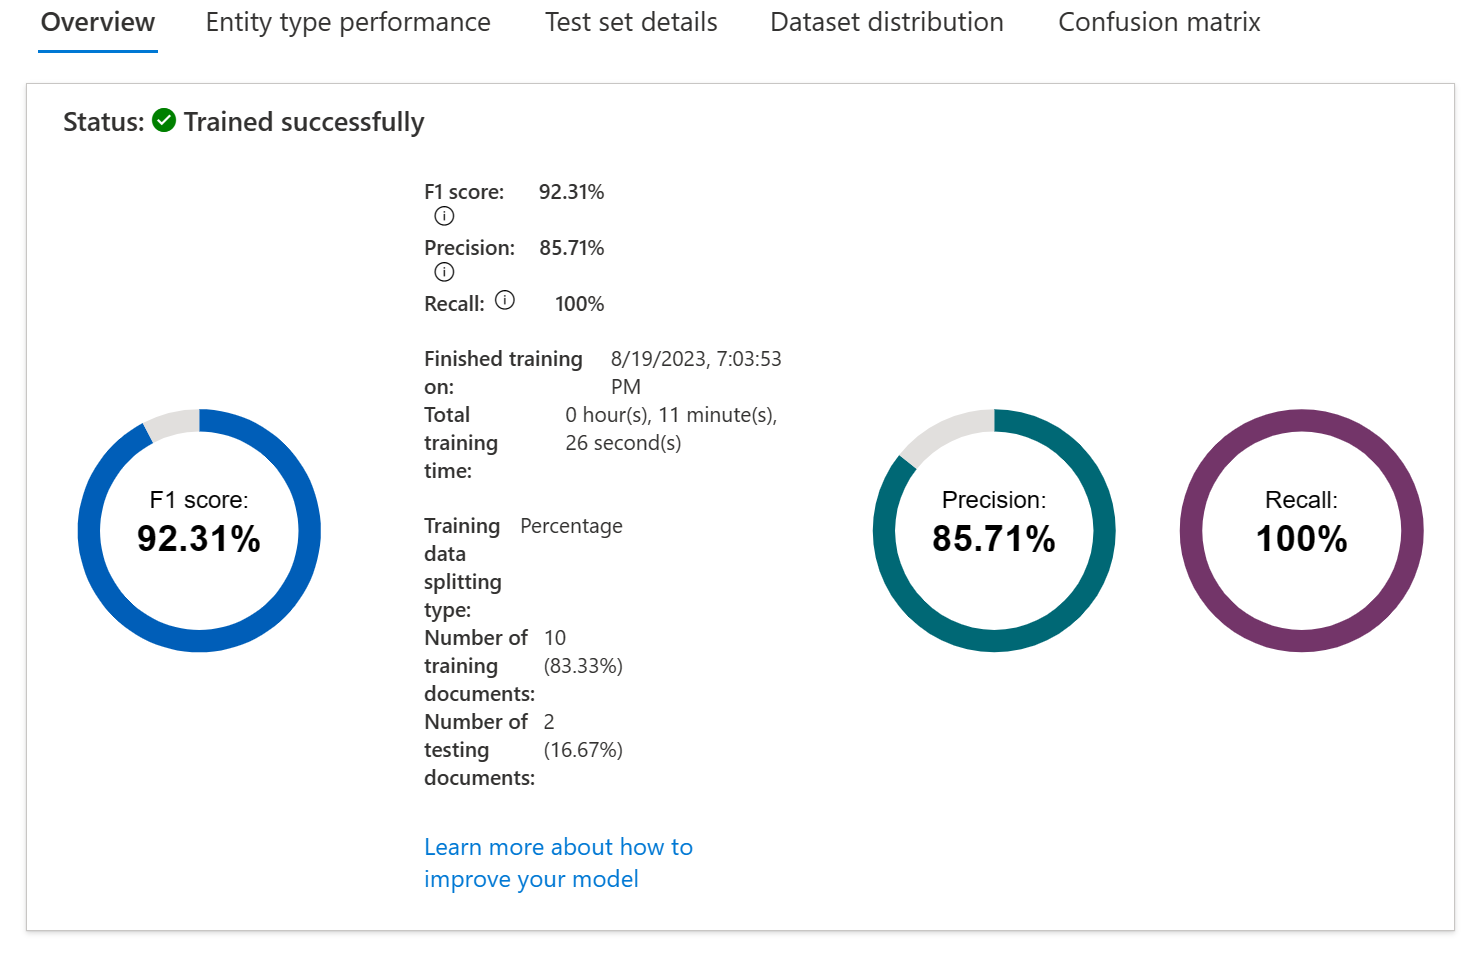
Individual entities and your overall model score are broken down into three metrics to explain how they're performing and where they need to improve.
Expand table
| Metric | Description | | --- | --- | | Precision | The ratio of successful entity recognitions to all attempted recognitions. A high score means that as long as the entity is recognized, it's labeled correctly. | | Recall | The ratio of successful entity recognitions to the actual number of entities in the document. A high score means it finds the entity or entities well, regardless of if it assigns them the right label | | F1 score | Combination of precision and recall providing a single scoring metric |
Scores are available both per entity and for the model as a whole. You may find an entity scores well, but the whole model doesn't.
How to interpret metrics
Ideally we want our model to score well in both precision and recall, which means the entity recognition works well. If both metrics have a low score, it means the model is both struggling to recognize entities in the document, and when it does extract that entity, it doesn't assign it the correct label with high confidence.
If precision is low but recall is high, it means that the model recognizes the entity well but doesn't label it as the correct entity type.
If precision is high but recall is low, it means that the model doesn't always recognize the entity, but when the model extracts the entity, the correct label is applied.
Confusion matrix
On the same View model details page, there's another tab on the top for the Confusion matrix. This view provides a visual table of all the entities and how each performed, giving a complete view of the model and where it's falling short.
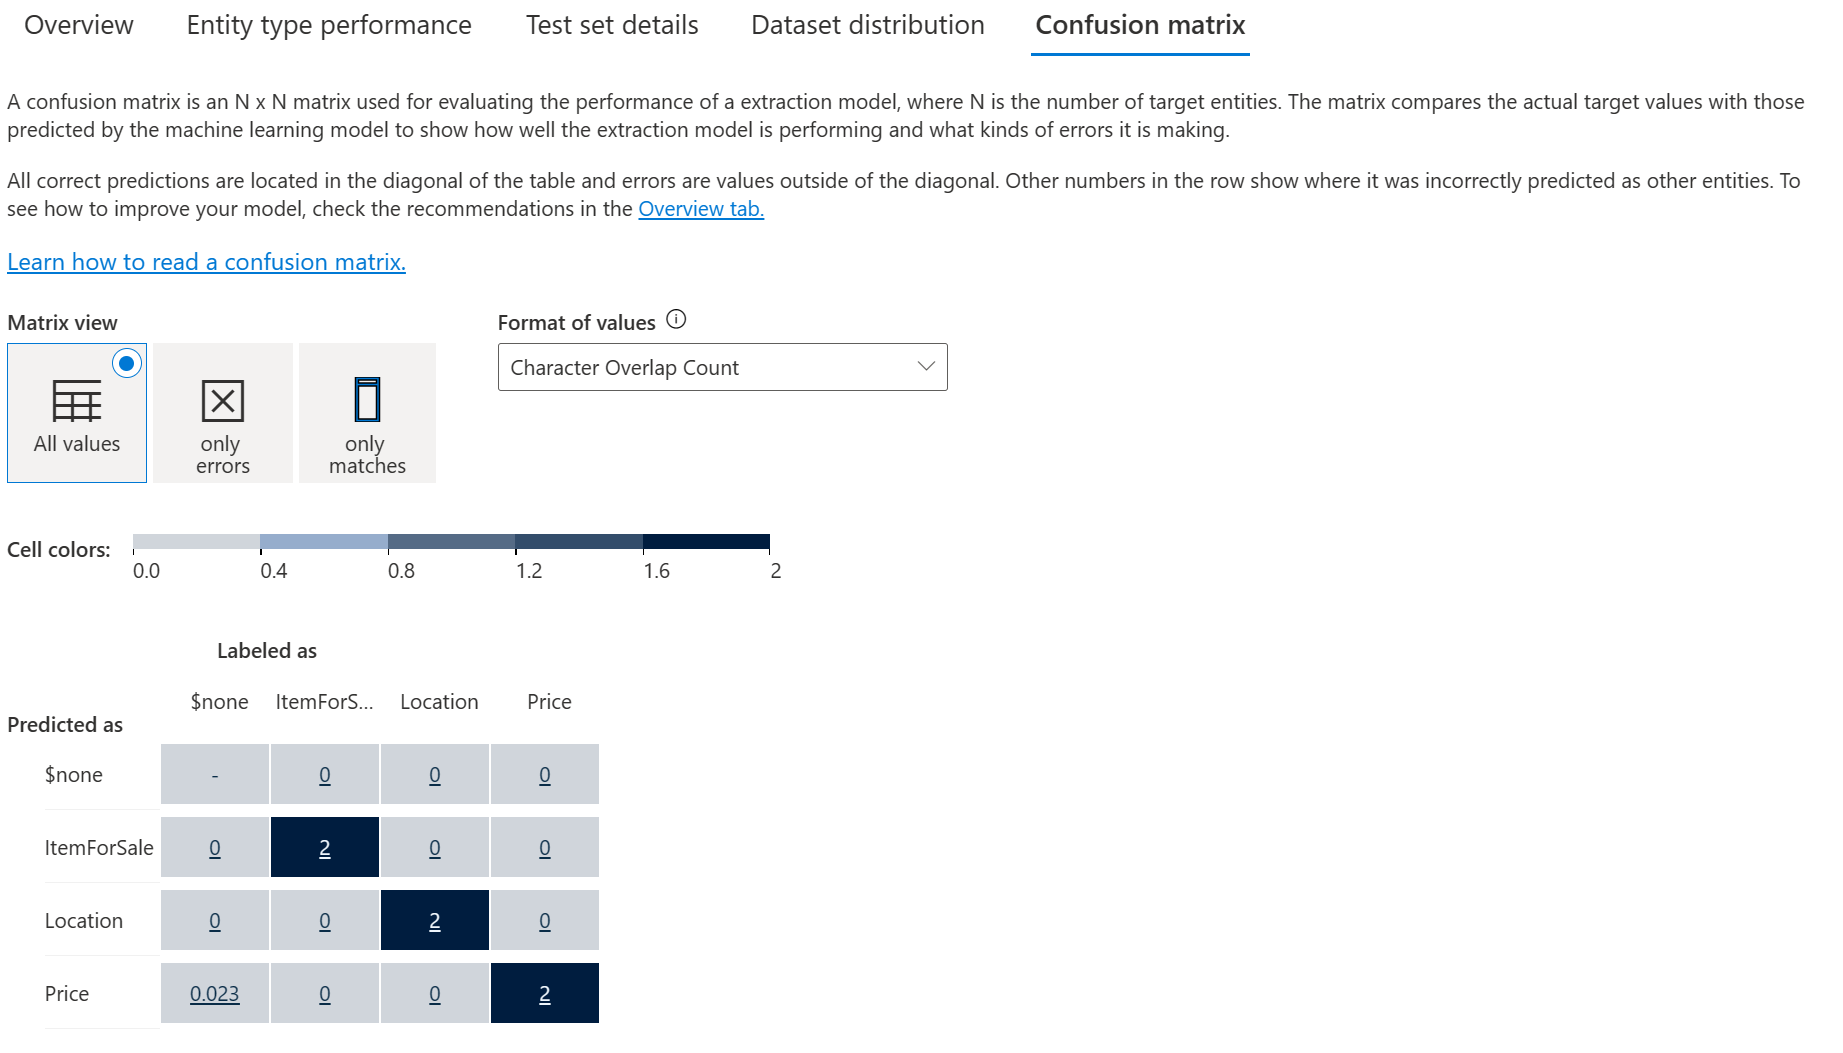
The confusion matrix allows you to visually identify where to add data to improve your model's performance.
Create a custom text classification solution
https://learn.microsoft.com/en-us/training/modules/custom-text-classification/
Understanding Types of Classification Projects
Custom text classification assigns labels, which in the Azure AI Language service is a class that the developer defines, to text files. For example, a video game summary might be classified as "Adventure", "Strategy", "Action" or "Sports".
Custom text classification falls into two types of projects:
- Single label classification - you can assign only one class to each file. Following the above example, a video game summary could only be classified as "Adventure" or "Strategy".
- Multiple label classification - you can assign multiple classes to each file. This type of project would allow you to classify a video game summary as "Adventure" or "Adventure and Strategy".
When creating your custom text classification project, you can specify which project you want to build.
Single vs. multiple label projects
Beyond the ability to put files into multiple classifications, the key differences with multiple label classification projects are labeling, considerations for improving your model, and the API payload for classification tasks.
Labeling data
In single label projects, each file is assigned one class during the labeling process; class assignment in Azure AI Language only allows you to select one class.
When labeling multiple label projects, you can assign as many classes that you want per file. The impact of the added complexity means your data has to remain clear and provide a good distribution of possible inputs for your model to learn from.
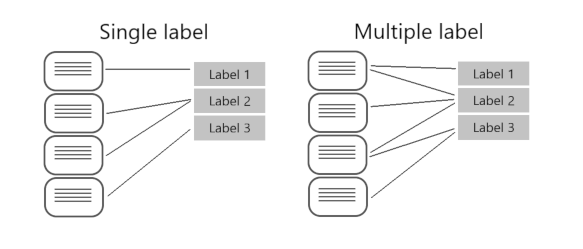
Labeling data correctly, especially for multiple label projects, is directly correlated with how well your model performs. The higher the quality, clarity, and variation of your data set is, the more accurate your model will be.
Evaluating and improving your model
Measuring predictive performance of your model goes beyond how many predictions were correct. Correct classifications are when the actual label is x and the model predicts a label x. In the real world, documents result in different kinds of errors when a classification isn't correct:
- False positive - model predicts x, but the file isn't labeled x.
- False negative - model doesn't predict label x, but the file in fact is labeled x.
These metrics are translated into three measures provided by Azure AI Language:
- Recall - Of all the actual labels, how many were identified; the ratio of true positives to all that was labeled.
- Precision - How many of the predicted labels are correct; the ratio of true positives to all identified positives.
- F1 Score - A function of recall and precision, intended to provide a single score to maximize for a balance of each component
Tip
Learn more about the Azure AI Language evaluation metrics, including exactly how these metrics are calculated
With a single label project, you can identify which classes aren't classified as well as others and find more quality data to use in training your model. For multiple label projects, figuring out quality data becomes more complex due to the matrix of possible permutations of combined labels.
For example, let's your model is correctly classifying "Action" games and some "Action and Strategy" games, but failing at "Strategy" games. To improve your model, you'll want to find more high quality and varied summaries for both "Action and Strategy" games, as well at "Strategy" games to teach your model how to differentiate the two. This challenge increases exponentially with more possible classes your model is classifying into.
API payload
Azure AI Language provides a REST API to build and interact with your model, using a JSON body to specify the request. This API is abstracted into multiple language-specific SDKs, however for this module we'll focus our examples on the base REST API.
To submit a classification task, the API requires the JSON body to specify which task to execute. You'll learn more about the REST API in the next unit, but worth familiarizing yourself with parts of the required body.
Single label classification models specify a project type of customSingleLabelClassification:
JSONCopy
{
  "projectFileVersion": "<API-VERSION>",
  "stringIndexType": "Utf16CodeUnit",
  "metadata": {
    "projectName": "<PROJECT-NAME>",
    "storageInputContainerName": "<CONTAINER-NAME>",
    "projectKind": "customSingleLabelClassification",
    "description": "Trying out custom multi label text classification",
    "language": "<LANGUAGE-CODE>",
    "multilingual": true,
    "settings": {}
  },
  "assets": {
    "projectKind": "customSingleLabelClassification",
        "classes": [
            {
                "category": "Class1"
            },
            {
                "category": "Class2"
            }
        ],
        "documents": [
            {
                "location": "<DOCUMENT-NAME>",
                "language": "<LANGUAGE-CODE>",
                "dataset": "<DATASET>",
                "class": {
                    "category": "Class2"
                }
            },
            {
                "location": "<DOCUMENT-NAME>",
                "language": "<LANGUAGE-CODE>",
                "dataset": "<DATASET>",
                "class": {
                    "category": "Class1"
                }
            }
        ]
    }
}
Multiple label classification models specify a project type of CustomMultiLabelClassification
JSONCopy
{
  "projectFileVersion": "<API-VERSION>",
  "stringIndexType": "Utf16CodeUnit",
  "metadata": {
    "projectName": "<PROJECT-NAME>",
    "storageInputContainerName": "<CONTAINER-NAME>",
    "projectKind": "customMultiLabelClassification",
    "description": "Trying out custom multi label text classification",
    "language": "<LANGUAGE-CODE>",
    "multilingual": true,
    "settings": {}
  },
  "assets": {
    "projectKind": "customMultiLabelClassification",
    "classes": [
      {
        "category": "Class1"
      },
      {
        "category": "Class2"
      }
    ],
    "documents": [
      {
        "location": "<DOCUMENT-NAME>",
        "language": "<LANGUAGE-CODE>",
        "dataset": "<DATASET>",
        "classes": [
          {
            "category": "Class1"
          },
          {
            "category": "Class2"
          }
        ]
      },
      {
        "location": "<DOCUMENT-NAME>",
        "language": "<LANGUAGE-CODE>",
        "dataset": "<DATASET>",
        "classes": [
          {
            "category": "Class2"
          }
        ]
      }
    ]
  }
}
Understand how to build text classification projects
Custom text classification projects are your workspace to build, train, improve, and deploy your classification model. You can work with your project in two ways: through Language Studio and via the REST API. Language Studio is the GUI that will be used in the lab, but the REST API has the same functionality. Regardless of which method you prefer, the steps for developing your model are the same.
Azure AI Language project life cycle
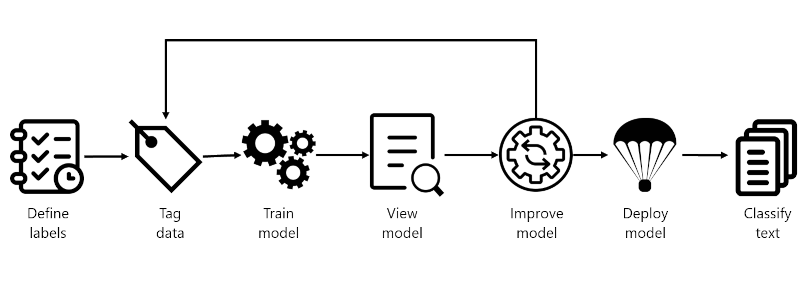
- Define labels: Understanding the data you want to classify, identify the possible labels you want to categorize into. In our video game example, our labels would be "Action", "Adventure", "Strategy", and so on.
- Tag data: Tag, or label, your existing data, specifying the label or labels each file falls under. Labeling data is important since it's how your model will learn how to classify future files. Best practice is to have clear differences between labels to avoid ambiguity, and provide good examples of each label for the model to learn from. For example, we'd label the game "Quest for the Mine Brush" as "Adventure", and "Flight Trainer" as "Action".
- Train model: Train your model with the labeled data. Training will teach our model what types of video game summaries should be labeled which genre.
- View model: After your model is trained, view the results of the model. Your model is scored between 0 and 1, based on the precision and recall of the data tested. Take note of which genre didn't perform well.
- Improve model: Improve your model by seeing which classifications failed to evaluate to the right label, see your label distribution, and find out what data to add to improve performance. For example, you might find your model mixes up "Adventure" and "Strategy" games. Try to find more examples of each label to add to your dataset for retraining your model.
- Deploy model: Once your model performs as desired, deploy your model to make it available via the API. Your model might be named "GameGenres", and once deployed can be used to classify game summaries.
- Classify text: Use your model for classifying text. The lab covers how to use the API, and you can view the API reference
How to split datasets for training
When labeling your data, you can specify which dataset you want each file to be:
- Training - The training dataset is used to actually train the model; the data and labels provided are fed into the machine learning algorithm to teach your model what data should be classified to which label. The training dataset will be the larger of the two datasets, recommended to be about 80% of your labeled data.
- Testing - The testing dataset is labeled data used to verify you model after it's trained. Azure will take the data in the testing dataset, submit it to the model, and compare the output to how you labeled your data to determine how well the model performed. The result of that comparison is how your model gets scored and helps you know how to improve your predictive performance.
During the Train model step, there are two options for how to train your model.
- Automatic split - Azure takes all of your data, splits it into the specified percentages randomly, and applies them in training the model. This option is best when you have a larger dataset, data is naturally more consistent, or the distribution of your data extensively covers your classes.
- Manual split - Manually specify which files should be in each dataset. When you submit the training job, the Azure AI Language service will tell you the split of the dataset and the distribution. This split is best used with smaller datasets to ensure the correct distribution of classes and variation in data are present to correctly train your model.
To use the automatic split, put all files into the training dataset when labeling your data (this option is the default). To use the manual split, specify which files should be in testing versus training during the labeling of your data.
Deployment options
Azure AI Language allows each project to create both multiple models and multiple deployments, each with their own unique name. Benefits include ability to:
- Test two models side by side
- Compare how the split of datasets impact performance
- Deploy multiple versions of your model
Note
Each project has a limit of ten deployment names
During deployment you can choose the name for the deployed model, which can then be selected when submitting a classification task:
JSONCopy
<...>
  "tasks": [
    {
      "kind": "CustomSingleLabelClassification",
      "taskName": "MyTaskName",
      "parameters": {
        "projectName": "MyProject",
        "deploymentName": "MyDeployment"
      }
    }
  ]
<...>
Using the REST API
The REST API available for the Azure AI Language service allows for CLI development of Azure AI Language projects in the same way that Language Studio provides a user interface for building projects. Language Studio is explored further in this module's lab.
Pattern of using the API
The API for the Azure AI Language service operates asynchronously for most calls. In each step we submit a request to the service first, then check back with the service via a subsequent call to get the status or result.
With each request, a header is required to authenticate your request:
Expand table
| Key | Value | | --- | --- | | Ocp-Apim-Subscription-Key | The key to your Azure AI Language resource |
Submit initial request
The URL to submit the request to varies on which step you are on, but all are prefixed with the endpoint provided by your Azure AI Language resource.
For example, to train a model, you would create a POST to the URL that would look something like the following:
restCopy
<YOUR-ENDPOINT>/language/analyze-text/projects/<PROJECT-NAME>/:train?api-version=<API-VERSION>
Expand table
| Placeholder | Value | Example | | --- | --- | --- | | | The endpoint for your API request | https://.cognitiveservices.azure.com | | | The name for your project (value is case-sensitive) | myProject |
The following body would be attached to the request:
JSONCopy
    {
        "modelLabel": "<MODEL-NAME>",
        "trainingConfigVersion": "<CONFIG-VERSION>",
        "evaluationOptions": {
            "kind": "percentage",
            "trainingSplitPercentage": 80,
            "testingSplitPercentage": 20
        }
    }
Expand table
| Key | Value | | --- | --- | | | Your model name. | | trainingConfigVersion | The model version to use to train your model. | | runValidation | Boolean value to run validation on the test set. | | evaluationOptions | Specifies evaluation options. | | kind | Specifies data split type. Can be percentage if you're using an automatic split, or set if you manually split your dataset | | testingSplitPercentage | Required integer field only if type is percentage. Specifies testing split. | | trainingSplitPercentage | Required integer field only if type is percentage. Specifies training split. |
The response to the above request will be a 202, meaning the request was successful. Grab the location value from the response headers, which will look similar to the following URL:
restCopy
<ENDPOINT>/language/analyze-text/projects/<PROJECT-NAME>/train/jobs/<JOB-ID>?api-version=<API-VERSION>
Expand table
| Key | Value | | --- | --- | | | Identifier for your request |
This URL is used in the next step to get the training status.
Get training status
To get the training status, use the URL from the header of the request response to submit a GET request, with same header that provides our Azure AI Language service key for authentication. The response body will be similar to the following JSON:
JSONCopy
{
  "result": {
    "modelLabel": "<MODEL-NAME>",
    "trainingConfigVersion": "<CONFIG-VERSION>",
    "estimatedEndDateTime": "2023-05-18T15:47:58.8190649Z",
    "trainingStatus": {
      "percentComplete": 3,
      "startDateTime": "2023-05-18T15:45:06.8190649Z",
      "status": "running"
    },
    "evaluationStatus": {
      "percentComplete": 0,
      "status": "notStarted"
    }
  },
  "jobId": "<JOB-ID>",
  "createdDateTime": "2023-05-18T15:44:44Z",
  "lastUpdatedDateTime": "2023-05-18T15:45:48Z",
  "expirationDateTime": "2023-05-25T15:44:44Z",
  "status": "running"
}
Training a model can take some time, so periodically check back at this status URL until the response status returns succeeded. Once the training has succeeded, you can view, verify, and deploy your model.
Consuming a deployed model
Using the model to classify text follows the same pattern as outlined above, with a POST request submitting the job and a GET request to retrieve the results.
Submit text for classification
To use your model, submit a POST to the analyze endpoint at the following URL:
restCopy
<ENDPOINT>/language/analyze-text/jobs?api-version=<API-VERSION>
Expand table
| Placeholder | Value | Example | | --- | --- | --- | | | The endpoint for your API request | https://.cognitiveservices.azure.com |
Important
Remember to include your resource key in the header for Ocp-Apim-Subscription-Key
The following JSON structure would be attached to the request:
JSONCopy
{
  "displayName": "Classifying documents",
  "analysisInput": {
    "documents": [
      {
        "id": "1",
        "language": "<LANGUAGE-CODE>",
        "text": "Text1"
      },
      {
        "id": "2",
        "language": "<LANGUAGE-CODE>",
        "text": "Text2"
      }
    ]
  },
  "tasks": [
     {
      "kind": "<TASK-REQUIRED>",
      "taskName": "<TASK-NAME>",
      "parameters": {
        "projectName": "<PROJECT-NAME>",
        "deploymentName": "<DEPLOYMENT-NAME>"
      }
    }
  ]
}
Expand table
| Key | Value | | --- | --- | | | Which task you're requesting. The task is CustomMultiLabelClassification for multiple label projects, or CustomSingleLabelClassification for single label projects | | | The language code such as en-us. | | | Your task name. | | | Your project name. | | | Your deployment name. |
The response to the above request will be a 202, meaning the request was successful. Look for the operation-location value in the response headers, which will look something like the following URL:
restCopy
<ENDPOINT>/language/analyze-text/jobs/<JOB-ID>?api-version=<API-VERSION>
Expand table
| Key | Value | | --- | --- | | | The endpoint for your API request | | | Identifier for your request |
This URL is used to get your task results.
Get classification results
Submit a GET request to the endpoint from the previous request, with the same header for authentication. The response body will be similar to the following JSON:
JSONCopy
{
  "createdDateTime": "2023-05-19T14:32:25.578Z",
  "displayName": "MyJobName",
  "expirationDateTime": "2023-05-19T14:32:25.578Z",
  "jobId": "xxxx-xxxxxx-xxxxx-xxxx",
  "lastUpdateDateTime": "2023-05-19T14:32:25.578Z",
  "status": "succeeded",
  "tasks": {
    "completed": 1,
    "failed": 0,
    "inProgress": 0,
    "total": 1,
    "items": [
      {
        "kind": "customSingleClassificationTasks",
        "taskName": "Classify documents",
        "lastUpdateDateTime": "2022-10-01T15:01:03Z",
        "status": "succeeded",
        "results": {
          "documents": [
            {
              "id": "<DOC-ID>",
              "class": [
                  {
                      "category": "Class_1",
                      "confidenceScore": 0.0551877357
                  }
              ],
              "warnings": []
            }
          ],
          "errors": [],
          "modelVersion": "2022-04-01"
        }
      }
    ]
  }
}
The classification result is within the items array's results object, for each document submitted.
Build a conversational language understanding model
https://learn.microsoft.com/en-us/training/modules/build-language-understanding-model/
Understand prebuilt capabilities of the Azure AI Language service
Preconfigured Features
- Summarization
- Named Entity Recognition
- Personally Identifiable Information
- Key Phrase Extraction
- Sentiment Analysis
- Language Detection
Learned Features
- Conversational Language Understanding (CLU) -
- Custom Named Entity Recognition
- Custom Text Classification
- Question Answering
Understand resources for building a conversational language understanding model
Build your model
First, you'll need to create your Azure AI Language resource in the Azure portal. Then:
- Search for Azure AI services.
- Find and select Language Service.
- Select Create under the Language Service.
- Fill out the necessary details, choosing the region closest to you geographically (for best performance) and giving it a unique name.
Once that resource has been created, you'll need a key and the endpoint. You can find that on the left side under Keys and Endpoint of the resource overview page.
Alternatively you can use Language Studio for the same
RestAPI
you'll need to submit a request to the appropriate URI for each step, and then send another request to get the status of that job.
For example, if you want to deploy a model for a conversational language understanding project, you'd submit the deployment job, and then check on the deployment job status.
Authentication
For each call to your Azure AI Language resource, you authenticate the request by providing the following header.
Expand table
| Key | Value | | --- | --- | | Ocp-Apim-Subscription-Key | The key to your resource |
Request deployment
Submit a POST request to the following endpoint.
restCopy
{ENDPOINT}/language/authoring/analyze-conversations/projects/{PROJECT-NAME}/deployments/{DEPLOYMENT-NAME}?api-version={API-VERSION}
Expand table
| Placeholder | Value | Example | | --- | --- | --- | | {ENDPOINT} | The endpoint of your Azure AI Language resource | https://.cognitiveservices.azure.com | | {PROJECT-NAME} | The name for your project. This value is case-sensitive | myProject | | {DEPLOYMENT-NAME} | The name for your deployment. This value is case-sensitive | staging | | {API-VERSION} | The version of the API you're calling | 2022-05-01 |
Include the following body with your request.
JSONCopy
{
  "trainedModelLabel": "{MODEL-NAME}",
}
Expand table
| Placeholder | Value | | --- | --- | | {MODEL-NAME} | The model name that will be assigned to your deployment. This value is case-sensitive. |
Successfully submitting your request will receive a 202 response, with a response header of operation-location. This header will have a URL with which to request the status, formatted like this:
restCopy
{ENDPOINT}/language/authoring/analyze-conversations/projects/{PROJECT-NAME}/deployments/{DEPLOYMENT-NAME}/jobs/{JOB-ID}?api-version={API-VERSION}
Get deployment status
Submit a GET request to the URL from the response header above. The values will already be filled out based on the initial deployment request.
restCopy
{ENDPOINT}/language/authoring/analyze-conversations/projects/{PROJECT-NAME}/deployments/{DEPLOYMENT-NAME}/jobs/{JOB-ID}?api-version={API-VERSION}
Expand table
| Placeholder | Value | | --- | --- | | {ENDPOINT} | The endpoint for authenticating your API request | | {PROJECT-NAME} | The name for your project (case-sensitive) | | {DEPLOYMENT-NAME} | The name for your deployment (case-sensitive) | | {JOB-ID} | The ID for locating your model's training status, found in the header value detailed above in the deployment request | | {API-VERSION} | The version of the API you're calling |
The response body will give the deployment status details. The status field will have the value of succeeded when the deployment is complete.
JSONCopy
{
    "jobId":"{JOB-ID}",
    "createdDateTime":"String",
    "lastUpdatedDateTime":"String",
    "expirationDateTime":"String",
    "status":"running"
}
For a full walkthrough of each step with example requests, see the conversational understanding quickstart.
Query your model
To query your model for a prediction, you can use SDKs in C# or Python, or use the REST API.
Query using SDKs
To query your model using an SDK, you first need to create your client. Once you have your client, you then use it to call the appropriate endpoint.
C#Copy
var languageClient = new TextAnalyticsClient(endpoint, credentials);
var response = languageClient.ExtractKeyPhrases(document);
PythonCopy
language_client = TextAnalyticsClient(
            endpoint=endpoint,
            credential=credentials)
response = language_client.extract_key_phrases(documents = documents)[0]
Other language features, such as the conversational language understanding, require the request be built and sent differently.
C#Copy
var data = new
{
    analysisInput = new
    {
        conversationItem = new
        {
            text = userText,
            id = "1",
            participantId = "1",
        }
    },
    parameters = new
    {
        projectName,
        deploymentName,
        // Use Utf16CodeUnit for strings in .NET.
        stringIndexType = "Utf16CodeUnit",
    },
    kind = "Conversation",
};
Response response = await client.AnalyzeConversationAsync(RequestContent.Create(data));
PythonCopy
result = client.analyze_conversation(
    task={
        "kind": "Conversation",
        "analysisInput": {
            "conversationItem": {
                "participantId": "1",
                "id": "1",
                "modality": "text",
                "language": "en",
                "text": query
            },
            "isLoggingEnabled": False
        },
        "parameters": {
            "projectName": cls_project,
            "deploymentName": deployment_slot,
            "verbose": True
        }
    }
)
Query using the REST API
To query your model using REST, create a POST request to the appropriate URL with the appropriate body specified. For built in features such as language detection or sentiment analysis, you'll query the analyze-text endpoint.
Tip
Remember each request needs to be authenticated with your Azure AI Language resource key in the Ocp-Apim-Subscription-Key header
restCopy
{ENDPOINT}/language/:analyze-text?api-version={API-VERSION}
Expand table
| Placeholder | Value | | --- | --- | | {ENDPOINT} | The endpoint for authenticating your API request | | {API-VERSION} | The version of the API you're calling |
Within the body of that request, you must specify the kind parameter, which tells the service what type of language understanding you're requesting.
If you want to detect the language, for example, the JSON body would look something like the following.
JSONCopy
{
    "kind": "LanguageDetection",
    "parameters": {
        "modelVersion": "latest"
    },
    "analysisInput":{
        "documents":[
            {
                "id":"1",
                "text": "This is a document written in English."
            }
        ]
    }
}
Other language features, such as the conversational language understanding, require the request be routed to a different endpoint. For example, the conversational language understanding request would be sent to the following.
restCopy
{ENDPOINT}/language/:analyze-conversations?api-version={API-VERSION}
Expand table
| Placeholder | Value | | --- | --- | | {ENDPOINT} | The endpoint for authenticating your API request | | {API-VERSION} | The version of the API you're calling |
That request would include a JSON body similar to the following.
JSONCopy
{
  "kind": "Conversation",
  "analysisInput": {
    "conversationItem": {
      "id": "1",
      "participantId": "1",
      "text": "Sample text"
    }
  },
  "parameters": {
    "projectName": "{PROJECT-NAME}",
    "deploymentName": "{DEPLOYMENT-NAME}",
    "stringIndexType": "TextElement_V8"
  }
}
Expand table
| Placeholder | Value | | --- | --- | | {PROJECT-NAME} | The name of the project where you built your model | | {DEPLOYMENT-NAME} | The name of your deployment |
Sample response
The query response from an SDK will in the object returned, which varies depending on the feature (such as in response.key_phrases or response.Value). The REST API will return JSON that would be similar to the following.
JSONCopy
{
    "kind": "KeyPhraseExtractionResults",
    "results": {
        "documents": [{
            "id": "1",
            "keyPhrases": ["modern medical office", "Dr. Smith", "great staff"],
            "warnings": []
        }],
        "errors": [],
        "modelVersion": "{VERSION}"
    }
}
For other models like conversational language understanding, a sample response to your query would be similar to the following.
JSONCopy
{
  "kind": "ConversationResult",
  "result": {
    "query": "String",
    "prediction": {
      "topIntent": "intent1",
      "projectKind": "Conversation",
      "intents": [
        {
          "category": "intent1",
          "confidenceScore": 1
        },
        {
          "category": "intent2",
          "confidenceScore": 0
        }
      ],
      "entities": [
        {
          "category": "entity1",
          "text": "text",
          "offset": 7,
          "length": 4,
          "confidenceScore": 1
        }
      ]
    }
  }
}
The SDKs for both Python and C# return JSON that is very similar to the REST response.
For full documentation on features, including examples and how-to guides, see the Azure AI Language documentation documentation pages.
Define Intents, utterances and entities
Utterances are the phrases that a user might enter when interacting with an application that uses your language model. An intent represents a task or action the user wants to perform, or more simply the meaning of an utterance. You create a model by defining intents and associating them with one or more utterances.
For example, consider the following list of intents and associated utterances:
- GetTime:
- "What time is it?"
- "What is the time?"
- "Tell me the time"
- GetWeather:
- "What is the weather forecast?"
- "Do I need an umbrella?"
- "Will it snow?"
- TurnOnDevice
- "Turn the light on."
- "Switch on the light."
- "Turn on the fan"
- None:
- "Hello"
- "Goodbye"
In your model, you must define the intents that you want your model to understand, so spend some time considering the domain your model must support and the kinds of actions or information that users might request. In addition to the intents that you define, every model includes a None intent that you should use to explicitly identify utterances that a user might submit, but for which there is no specific action required (for example, conversational greetings like "hello") or that fall outside of the scope of the domain for this model.
After you've identified the intents your model must support, it's important to capture various different example utterances for each intent. Collect utterances that you think users will enter; including utterances meaning the same thing but that are constructed in different ways. Keep these guidelines in mind:
- Capture multiple different examples, or alternative ways of saying the same thing
- Vary the length of the utterances from short, to medium, to long
- Vary the location of the noun or subject of the utterance. Place it at the beginning, the end, or somewhere in between
- Use correct grammar and incorrect grammar in different utterances to offer good training data examples
- The precision, consistency and completeness of your labeled data are key factors to determining model performance.
- Label precisely: Label each entity to its right type always. Only include what you want extracted, avoid unnecessary data in your labels.
- Label consistently: The same entity should have the same label across all the utterances.
- Label completely: Label all the instances of the entity in all your utterances.
Entities are used to add specific context to intents. For example, you might define a TurnOnDevice intent that can be applied to multiple devices, and use entities to define the different devices.
Consider the following utterances, intents, and entities:
Expand table
| Utterance | Intent | Entities | | --- | --- | --- | | What is the time? | GetTime | | | What time is it in London? | GetTime | Location (London) | | What's the weather forecast for Paris? | GetWeather | Location (Paris) | | Will I need an umbrella tonight? | GetWeather | Time (tonight) | | What's the forecast for Seattle tomorrow? | GetWeather | Location (Seattle), Time (tomorrow) | | Turn the light on. | TurnOnDevice | Device (light) | | Switch on the fan. | TurnOnDevice | Device (fan) |
You can split entities into a few different component types:
- Learned entities are the most flexible kind of entity, and should be used in most cases. You define a learned component with a suitable name, and then associate words or phrases with it in training utterances. When you train your model, it learns to match the appropriate elements in the utterances with the entity.
- List entities are useful when you need an entity with a specific set of possible values - for example, days of the week. You can include synonyms in a list entity definition, so you could define a DayOfWeek entity that includes the values "Sunday", "Monday", "Tuesday", and so on; each with synonyms like "Sun", "Mon", "Tue", and so on.
- Prebuilt entities are useful for common types such as numbers, datetimes, and names. For example, when prebuilt components are added, you will automatically detect values such as "6" or organizations such as "Microsoft". You can see this article for a list of supported prebuilt entities.